Rainmeter 4.4
Содержание:
- Conclusion
- Format
- Aero Blur options
- Percentage
- Настройка Rainmeter
- Why should you install some of the best Rainmeter skins on your Windows system?
- Загрузка скинов Rainmeter
- Почему Rainmeter?
- Настройте свой рабочий стол с Rainmeter
- Example
- Values
- Best Rainmeter Skins for Superhero Flicks Fans/Movie Buffs
- Files and Folders
- The Game mode tab
- Usage
- Other enhancements and fixes in Rainmeter 4.1
Conclusion
All the aforementioned skins are unique in their own way and lend a definitive charm and personalized appeal to your desktop if you are tired of seeing the same old themes of your boring Windows OS. Interestingly, you can also choose to mix two or more rainmeter skins if you want to step up your game.
Further, by blending a couple of rainmeter themes, you can create distinctive widgets that depict RAM usage, date/time, system configuration, and thus in the process, create a whole new customized skin. Rest assured, with some of the best rainmeter skins at the helm, your desktop will get a much needed royal makeover that will not only attract eyeballs, but also showcase your tastes.
And…that’s a wrap! Did you like our roundup of the best rainmeter skins for Windows 10/8.1/8 and Windows 7? We scoured the web to find these beauties from sites like DeviantArt, and even Reddit. If any of your favourite skins deserve a mention, do let us know in the comments.
SEE ALSO: Best Android Emulator for Windows and Mac
Format
The file is written as a standard INI file, which uses the following format:
Key=Value |
Each property of the skin is defined by a section. Each key is an option that modifies that property. The following sections may be used in skins:
-
Defines options that affect the entire skin.
-
Defines text strings that can be used throughout the skin.
-
Measures
Objects that retrieve (or «measure») information of some kind. -
Meters
Objects that display information and other visual elements. -
Define options that may be used by several meters.
-
Defines the name, version, license, and other non-functional information about the skin.
A skin must have at least one meter. All other properties are optional, and may not even be present, depending on what is needed for the skin. For skins that are publicly distributed, the section is strongly recommended.
There are only a few rules about using the INI format:
- All section names in a skin must be unique.
- All option names within a section must be unique.
- Section and option names should include alphanumeric characters only (no spaces or punctuation).
- Option values must be kept on a single line.
«Quotes» are not needed around strings used as an option value. Rainmeter will ignore quotes around option values.
Aero Blur options
- Default:
-
Set to 1 to enable Aero Blur on the Windows 7 operating system. If no BlurRegions are specified, the entire skin background is blurred.
Note: The function will not work on Window 8.1 or Windows 10.
-
Defines areas and shapes of the one or more regions of the skin to be blurred. The format of the option is: .
Valid values for are:
- : Region is disabled
- : Rectangular region
- : Rectangular region with rounded corners (requires )
- : Elliptical region
The parameters following define the size and shape of the region. They are, in order:
- : Top left horizontal point in the skin
- : Top left vertical point in the skin
- : Bottom right horizontal point in the skin
- : Bottom right vertical point in the skin
- : Radius of the corners of rounded rectangles (required for )
Note: Aero Blur options can be dynamically controlled with several .
Example
Update=1000Blur=1BlurRegion=1,10,10,190,50BlurRegion2=3,10,70,80,110BlurRegion3=2,10,130,190,170,15Meter=ImageW=200H=180SolidColor=,,,50LeftMouseUpAction= |
Percentage
Some meters require that a measure provide a value that can be used as a percentage. These would include Bar, Histogram, Line, Rotator and Roundline meters. In order for these meters to know that the current value of the measure is 27%, they need to know what value 100% represents. In addition, you may want to display the percentage of the total value a measure is currently at in a String meter, or use the percentage value of a measure in a formula.
The percentage of the total that a measure’s current value reflects is based on the «range» that the measure can be. This is defined as the and of the measure.
Some measures, for example CPU, FreeDiskSpace and Memory, automatically set the minimum and maximum range that the measure can be. FreeDiskSpace for instance knows how big the drive you are measuring is, and will set the MinValue to zero, and the MaxValue to the actual size of the drive. Then you can just use the measure’s value in a meter by binding the measure to it with and the percentage will be used in the display of the meter. There is nothing you need to do for this to work properly.
Other measures do not know themselves what the maximum value the measure can be. Examples of this are the NetIn/NetOut/NetTotal measures, SpeedFan, any Calc measures, and any WebParser measures. What Rainmeter will do in this case is to set the MinValue and MaxValue of the measure dynamically, to the smallest and largest values the measure has been since the skin was loaded or refreshed. This may not always be the behavior you desire.
To address this, you can manually define the range that the measure can be, by setting the and options on the measure. Remember, you set this on the measure you are going to use as a percentage, not on the meter that is using it.
For example:
Measure=PluginPlugin=SpeedFanPluginSpeedFanType=TEMPERATURESpeedFanScale=CSpeedFanNumber=2MinValue=30MaxValue=100Meter=BarMeasureName=MeasureCPUTemp |
While the String meter does not require a percentage when displaying the number value of a measure, it can be told to use the value as a percentage, by using the Percentual option on the meter. The meter will then use the MinValue and MaxValue of the measure to calculate what percentage of that the current value is.
In addition, you can use the percentage value of a measure in a formula or String meter by using the measure as a Section Variable, with the .
Setting these options has no effect on the actual value of the measure, but only defines the low and high range, to used by meters.
Note: The current MinValue / MaxValue «range» for a measure can be viewed in the of the About window. This can be useful for debugging problems when you are not getting the meter output you expect.
Настройка Rainmeter
По умолчанию запущенное приложение размещает на рабочем столе четыре виджета — приветственный, часы, система и диск, из которых вы наверняка захотите скрыть первый. Сделать это можно либо из контекстного меню виджета (контекстное меню доступно для всех модулей),
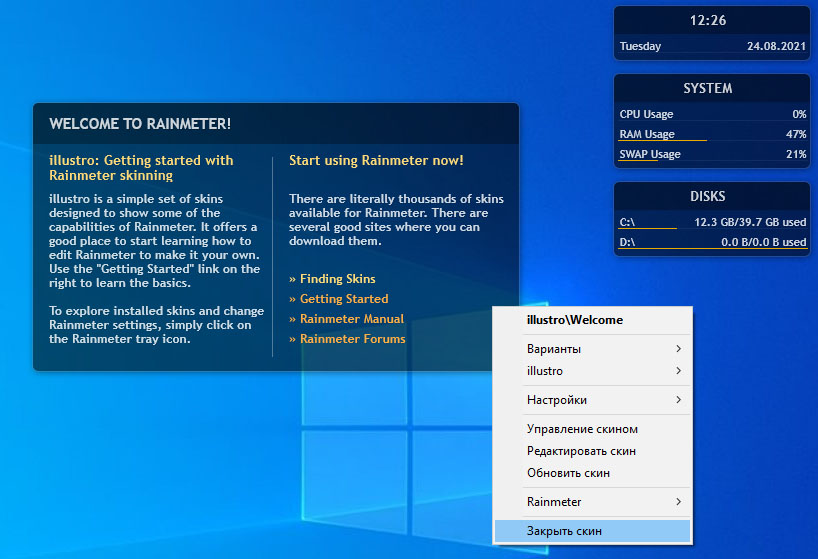
либо из главного контекстного меню иконки Rainmeter в системном трее.
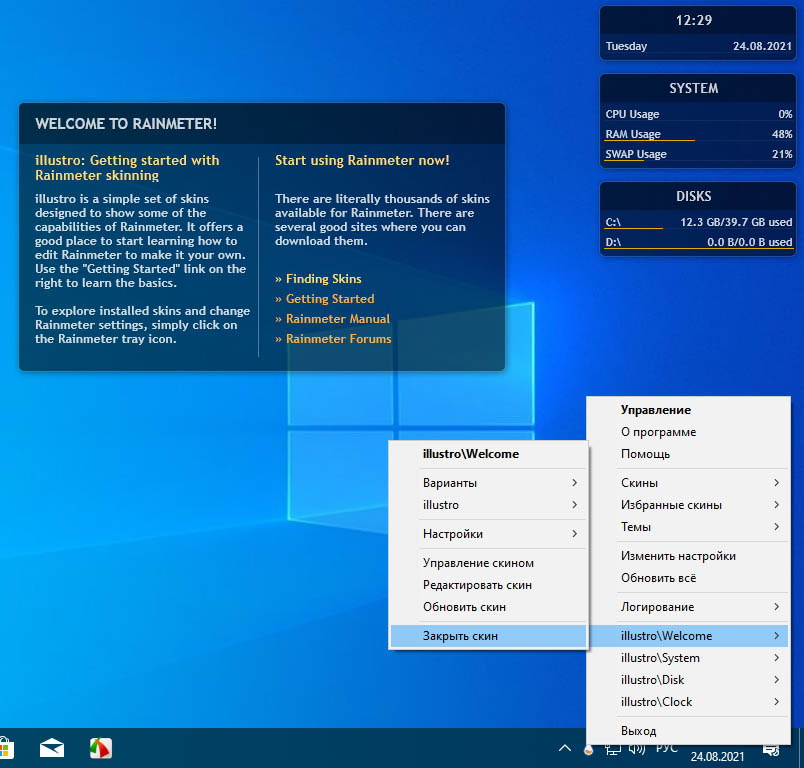
Внешний вид, координаты и прочие параметры отображения настраиваются в окне управления, вызываемом из главного меню. Окно настроек имеет три вкладки.
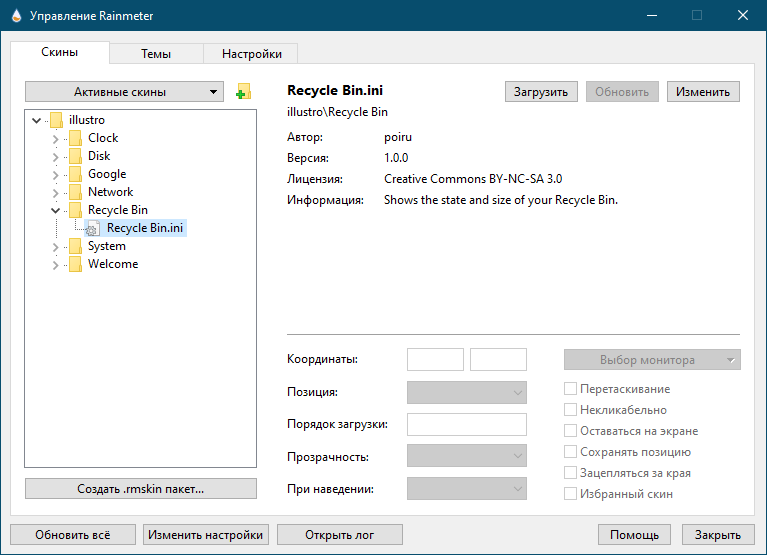
Скины — Вкладка содержит список установленных виджетов, которые могут быть добавлены на рабочий стол. Чтобы добавить модуль, выделяем его в списке и жмем «Загрузить». На этой же вкладке можно настроить поведение виджета, его координаты расположения на рабочем столе, уровень прозрачности и порядок загрузки.
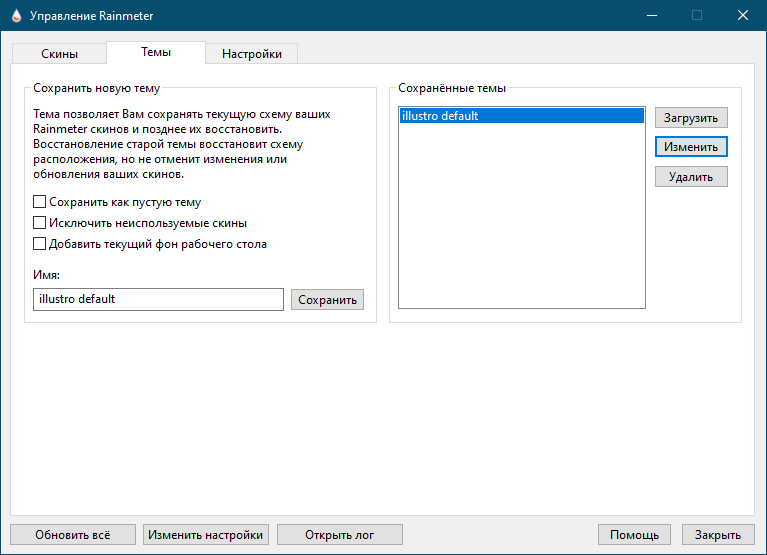
Темы — Вкладка «Темы» содержит список тем — наборов виджетов. По умолчанию в Rainmeter будет доступна только одна тема — illustro defaul.
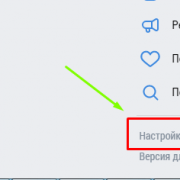
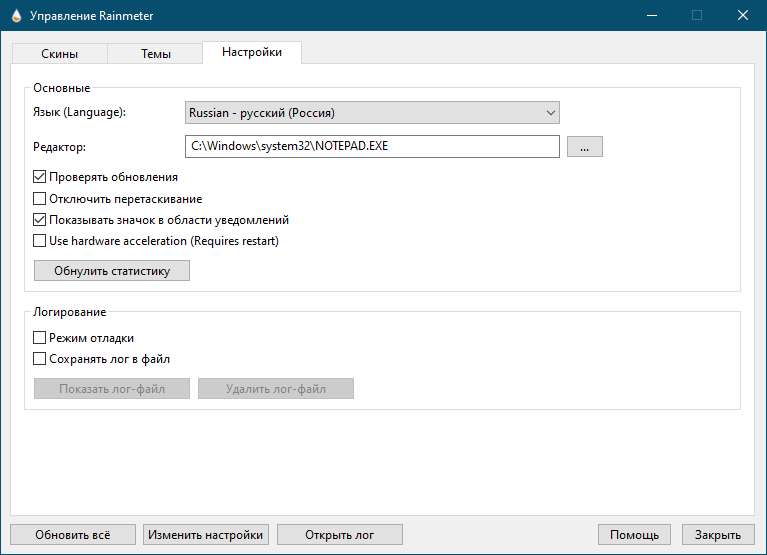
Вкладка «Настройки» содержит локализации, путь к используемому редактору INI-файлов и некоторые другие дополнительные опции. В качестве редактора конфигурационных файлов скинов по умолчанию используется Блокнот.


Why should you install some of the best Rainmeter skins on your Windows system?
For those of you not in the loop, Rainmeter is a great open-source Windows customization tool that proffers easy customization options for your desktop and embellishes its overall look/layout substantially. The next question that arises is “how to use these skins, man?” Well, with RainMeter at the helm, you can do away with the need to download hundreds of wallpapers, widgets or bogus apps since there are hordes of RainMeter themes that a user can sift through without changing their wallpaper every now and then.
Of course, you can customize these Rainmeter themes to the brim and craft a distinctive look for your desktop! So, are you ready to find out the best Rainmeter skins for Windows 10/8.1/8 and Windows 7? Without further ado, let’s get started.
Загрузка скинов Rainmeter
Процесс загрузки скина и его загрузки на рабочий стол довольно прост. Найти хороший скин и настроить его так, чтобы он выглядел так, как вы хотите, — это то, что может сбивать с толку. Для начала давайте найдем скин. Помните, что сообщество, которое создает скины Rainmeter, является открытым исходным кодом, то есть любой может создать скин и опубликовать его в Интернете для загрузки.
Это также означает, что существует вероятность злонамеренной активности
Всякий раз, когда вы загружаете что-либо, опубликованное из независимого источника, который вы не можете проверить на целостность, вы должны проявлять осторожность и понимание, когда вам нужно в него войти. Будьте внимательны при загрузке скина и убедитесь, что вы не загружаете то, что не хотите загружать
С этим предупреждением, давайте перейдем к фактическому поиску и загрузке скина. Благодаря этому процессу я использовал сайт Визуальные скины найти скины, которые я хочу. Вы также можете найти скины на девиантном искусстве. Rainmeter обеспечивает список ресурсов Вы также можете использовать понравившуюся вам кожу.
Я собираюсь использовать скин, который я нашел в Visual Skins, для демонстрации загрузки скинов. Для начала найдите ссылку для скачивания скина, который вы хотите установить.
Это ссылка на скачивание скина, который я собираюсь продемонстрировать.
После того, как вы нажмете, скин должен автоматически загрузиться. Чтобы активировать его, найдите место, где был загружен скин, и дважды щелкните файл. Значок должен выглядеть примерно так:
Дважды щелкните по нему, и обложка автоматически загрузится на ваш рабочий стол.
Разгрузка скинов
Если вам не нравится, как он выглядит, и вы хотите удалить его, вам придется выгрузить Это. Есть два способа выгрузить скин с вашего рабочего стола. Во-первых, вы можете щелкнуть правой кнопкой мыши на скине и нажать разгрузить кожу.
При нажатии на этот скин должен быть удален с рабочего стола. Вы также можете открыть меню Rainmeter, которое мы нашли ранее, и выгрузить скин оттуда.
Каждый скин Rainmeter функционирует по-разному, поэтому охват особенностей настройки скина здесь не выгоден, так как это больше обзор того, как получать скины на рабочем столе и выключать его. Некоторые скины так же просто, как загрузить и дважды щелкнуть, чтобы открыть. Затем вы можете просто нажать и перетащить его туда, куда вы хотите. Вы также можете комбинировать различные скины. Некоторые скины содержат много разных частей, например ту, которую я скачал в своем примере.
Все эти вещи пришли в комплекте с кожей. Не все скины такие. В некоторых скинах будут только часы, визуализатор и т. Д.
Скин, который я скачал, предустановлен с этим макетом. Это называется NXT-OS если вы хотите хороший скин, который уже имеет много предустановленных функций. Вы также можете загружать разные части, такие как часы и визуализатор, отдельно, как я делал на втором дисплее.
Вот мой второй монитор с двумя разными скинами, объединенными, чтобы сделать часы красивыми.
С этими типами скинов, чтобы поместить их в нужное вам место, все, что вам нужно сделать, это нажать и удерживать, а затем перетащить обложку в то место на рабочем столе, на котором вы хотите ее разместить. Многие скины также имеют меню настроек, если они включают в себя несколько частей. Для скина NXT-OS есть процесс установки, который вам нужно пройти, и экран приветствия, к которому вы можете получить доступ в любое время. Вот как выглядит экран приветствия.
Приветственное меню
Также имеется меню настроек для настройки различных частей скина.
Меню настроек
Подводя итоги
Все зависит от того, что вы там найдете и как разработчик настроил свой скин. Сайт Rainmeter предоставляет множество ресурсов для создания привлекательного рабочего стола, и существует большое сообщество людей, которые используют Rainmeter и создают свои собственные скины.
На сайте Rainmeter они предоставляют ссылку на их форум где многие люди обсуждают вопросы / проблемы, которые у них есть на Rainmeter. Лучший способ получить именно тот рабочий стол, который вам нужен, — погрузиться в сообщество. Я надеюсь, что эта статья, по крайней мере, дала вам общее представление о том, как ориентироваться в Rainmeter и настроить его на своем компьютере.
Почему Rainmeter?
Очарование Rainmeter происходит от его колеблющихся уровней сложности. Нужен виджет погоды? Нет проблем. Нужен настольный календарь? Выполнено. Тем не менее, если вы готовы потратить несколько часов на изучение фонов, приложений, связывания программ и многоуровневой настольной системы, вам неизвестно, что вы можете создать.
Когда дело доходит до витрин Rainmeter, субреддит Reddit / r / Rainmeter не имеет аналогов. Думаешь иметь минимальный рабочий стол? Он не менее минимален, чем великолепная подача / u / danyisill .

Вы когда-нибудь хотели, чтобы ваш фон двигался с помощью мыши? Попробуйте добиться эффекта параллакса похоже на отличный рабочий стол / u / nirosat .

Вы поклонник видеоигр? Хотите расширить свой фэндом на рабочий стол? Приложите усилия, чтобы создать такой же опыт, как тема / u / akmos ‘Overwatch.

Вы предпочитаете меньшую, более простую тему рабочего стола? Rainmeter может сделать это, как в случае с моим собственным рабочим столом.

Прежде чем вы начнете делать скины самостоятельно, лучше сначала ознакомиться с основами.
Настройте свой рабочий стол с Rainmeter
Независимо от вашего стиля рабочего стола, вы можете найти скин Rainmeter, чтобы соответствовать. Вы можете использовать скины Rainmeter, чтобы получить все виды инструментов для вашего рабочего стола, такие как часы, системные мониторы, календари и программы запуска. Для дальнейшего вдохновения рабочие столы subreddits / r / rainmeter и / r / desktop предоставляют ежедневные модификации рабочего стола, которые вы можете проверить.
Если вы хотите еще больше изменить свой рабочий стол, изменив системные звуки Windows, цвета акцента и экран блокировки, ознакомьтесь с нашим руководством о том, как изменить внешний вид вашего рабочего стола Windows 10
Как изменить внешний вид вашего рабочего стола Windows 10
Как изменить внешний вид вашего рабочего стола Windows 10Вы только что обновились до Windows 10, и вам интересно, как вы можете настроить и персонализировать его. Мы поможем вам превратить ваш рабочий стол в виртуальную среду Windows, шаг за шагом.
Прочитайте больше
,
Узнайте больше о: Rainmeter, системный монитор, погода, Windows App Launcher, настройки Windows.
Example
Update=1000AccurateText=1DynamicWindowSize=1Name=ExampleMeterRoundlineAuthor=The Rainmeter TeamInformation=Example of the Roundline meterLicense=Creative Commons Attribution-Non-Commercial-Share Alike 3.0Version=1.0TotalColor=173,230,224,255FreeColor=75,171,161,255UsedColor=255,205,112,255Measure=FreeDiskSpaceDrive=C:Total=1Measure=FreeDiskSpaceDrive=C:InvertMeasure=1Measure=FreeDiskSpaceDrive=C:Meter=RoundlineMeasureName=MeasureTotalDiskX=10Y=W=120H=120StartAngle=4.712RotationAngle=6.283LineLength=60LineColor=Solid=1AntiAlias=1Meter=RoundlineMeasureName=MeasureUsedDiskX=10Y=W=120H=120StartAngle=4.712RotationAngle=6.283LineLength=52LineColor=Solid=1AntiAlias=1Meter=RoundlineMeasureName=MeasureFreeDiskX=10Y=W=120H=120StartAngle=4.712RotationAngle=-6.283LineLength=52LineColor=Solid=1AntiAlias=1Meter=StringMeasureName=MeasureTotalDiskX=70Y=130FontSize=11FontColor=StringAlign=CenterAntiAlias=1AutoScale=1Text=Total Disk: %1BMeter=StringMeasureName=MeasureUsedDiskX=70Y=6RFontSize=11FontColor=StringAlign=CenterAntiAlias=1AutoScale=1Text=Used Disk: %1BMeter=StringMeasureName=MeasureFreeDiskX=70Y=6RFontSize=11FontColor=StringAlign=CenterAntiAlias=1AutoScale=1Text=Free Disk: %1B |
An example skin demonstrating a Roundline meter.
Values
A measure actually provides two values: a string, or «raw text,» and a number, which can be used in calculation formulas. Depending on the type of measure, these values may be the same, which means you can use them interchangeably; or, they may be completely different. The article for each measure type explains what is provided for both the number and string values.
-
When a meter is , it automatically uses the correct value for its type.
-
When using Section Variables, different syntax is used to refer to a measure’s string or number value.
-
The Substitute option affects only the string value of the current measure.
-
IfAction options use only the number value of the current measure.
-
The option in a Calc measure uses only the number values of other measures, unless section variables are used instead.
Although a string value is not a «true» number, it can be used like a number in formulas and options, as long as it contains only numeric characters and . (Otherwise, it is treated as zero.) Likewise, a number value can be displayed or stored to a variable as a string of text, although this may cause the value to lose precision.
Best Rainmeter Skins for Superhero Flicks Fans/Movie Buffs
Granted, being in the company of superheroes in real-life is like dreaming of fiction, but you can at least bring that fiction to life on your desktop through the Avengers S.H.I.E.L.D OS theme. This Avengers-exclusive theme is available in a plethora of resolutions, and includes nifty shortcuts to your recently accessed applications such as Media player and Browser.
Other widgets include the likes of Media playback/control bar, the S.H.I.E.L.D Eagle tag and RAM and CPU usage stats.
This rainmeter skin proves that you don’t have to be Tony Stark to attain your own fully-customized J.A.R.V.I.S powered computer. For starters, IronMan Jarvis boasts multiple modules that can be swiftly re-positioned, and it is most importantly, super customizable. It can also display some useful information such as Hard disk capacity, shortcuts to the system folders, Clock/Date, Current Temperature, and RSS feeds that all transpire from Iron Man’s arc reactor core hub.
DC fans in the house rejoice for there is a skin based on the legendary Batman! Any Batman lover would be enchanted with the sheer amount of resemblance this skin has to the aura and realm of Batman. All the widgets are customized on the lines of Batman equipment such as the BatMobile. So, don’t think twice if you are planning on getting this skin.
The cine flick World War Z surely was a goosebump inducing mega hit, and the rainmeter skin variant of the movie doesn’t disappoint either. Despite sporting a minimal-esque layout, World War Z can lighten up your desktop with some serious animation effects and widgets hub.
Sci-fi saga Tron Legacy comes to life on your desktop with this illustrious rainmeter skin that is both eye-catching and visually appealing. The Legacy skin of RainMeter boasts fully customizable wallpaper and a widgets hub that would make you not want to take your eyes off your desktop.
Nanoschematic desktop is a rather bizarre sci-fi skin, in the sense, that it gives your desktop a nerdy look. Of course, it does feature a lot of sub-modules with full-fledged customization options.
Rounding off our list of the best Rainmeter skins in style is the End of the World theme that reimagines the world of the future. True to its name, this theme is based off scenery depicting a ravaged World after an apocalypse or World war. Although, not based on any real scenario, End of the World is a must for conspiracy theorists.
You can come across the half-ended background of the earth on your screen that serves as a stark reminder of the destruction a bloody war can cause and use customized icons, clock, widgets, clock, et al. which will distract your attention from the mayhem on your screen.
Files and Folders
All skins are stored in Rainmeter’s «Skins» folder. If Rainmeter has been installed normally, the default location of the Skins folder is:
If Rainmeter is installed as a , the Skins folder is found in the installation folder. The Skins folder can also be changed in Rainmeter’s .
A skin is stored as a named .ini text file e.g. SkinName.ini in its own named folder within Skins, as in: .
All of these folder paths may be referenced in a skin as built-in-variables.
Variants
If a single folder contains multiple , …etc. files, they are each considered variants of the same skin. Only one variant can be active at a time, and all variants use the same settings. Separate skins not to be treated as variants must be stored in separate folders.
Variants:
Separate skins:
@Resources
Any supporting files used by the skin, such as images, addon executables, sounds, or Lua scripts, should also be stored in the skin folder. Complex skins are recommended to store supporting files in a folder called @Resources inside the folder. The @Resources folder is used by Rainmeter to load custom fonts and .
Config
Each skin is identified with a certain config name. The config name is based on the path from the main Skins folder to the skin file. For example, if a skin is located at…
…then the config name would be:
Because skins may have any number of variants, many Rainmeter features, especially bangs, refer to a specific skin by its config name, rather than the skin’s filename.
Root config
Skins may also be stored in subfolders within the same root config folder. They share the same @Resources folder, and are packaged and installed together. Otherwise, Rainmeter treats each subfolder as a separate config.
For example, the following skins belong to the «illustro» suite:
This means that they are both located in the same root config folder, «illustro,» in the main Skins directory.
The root config folder for a skin will ALWAYS be directly under . No matter how many levels of folders your suite of skins may have, there will always be a single, shared root config folder for that suite of skins, directly under the ..Skins\ folder. This is where the @Resources folder must be.
Each skin has a unique config name:
But since they belong to the same root config, they share the same @Resources folder:
A suite is an informal term for skins that are organized together in this manner. Suites are often used by skin authors to make a set of skins that share a common style, or complement each other in some way. If a root config folder contains only one file, then the config and root config are the same, and the skin can be stored, packaged and installed by itself.
The Game mode tab
Game mode is used to unload some or all skins when running a full-screen game, in order to save Rainmeter CPU and GPU resources while playing.
This can be configured to be automatically triggered by checking the box, which will automatically enter Game mode when any full-screen D3D game is active on the primary monitor.
In addition, one or more processes of your choice that are not full-screen D3D games can be entered one process per line in the text box, and when any of those processes are running, game mode will be triggered.
On start
What happens when Game mode starts is controlled by the pulldown. This can be set to the default or any defined that you create.
On stop
What happens when Game mode stops is controlled by the pulldown. This can be set to the default , which will load the skins that were running before Game mode was triggered, or any defined that you create.
Simply create the you want to use for Game mode and , and select them from these pulldowns.
Game mode can also be started and stopped manually, as well as fully configured, from the Rainmeter tray icon context menu.
Note that if you manually start or stop Game mode, the checkboxes for automatic triggering will be turned off, and you will need to enable them again, either from the context menu, or from Manage.
Usage
Unlike meters, measures do not display anything by themselves. You cannot «see» a measure in a skin. The measure simply provides the information as a , which can be used in several ways:
-
A meter can be . In this way, the meter will automatically display the value in a way that is appropriate for the type of meter. This also takes the measure’s range and scale into account (if applicable).
-
The measure value can be referenced as a section variable. In this way, the value can be used in almost any meter or measure option. As a section variable, the value is used «literally,» which means it does not automatically account for the range or scale.
-
A measure can trigger an action when the value passes into a certain range.
Some measure types may have their own special rules. These are detailed in their individual articles.
Other enhancements and fixes in Rainmeter 4.1
CoreTemp Plugin: The author of both the CoreTemp application and Rainmeter plugin, Arthur Liberman, added CPU core-specific values to the data available in the plugin. See CoreTemp plugin for details.
Manage dialog: When a skin is selected in the Skins list, the Enter key will toggle loading and unloading the skin.
Illustro default skins: Changed the URL used to get the user’s WAN IP address in the Network skin in Illustro. Note that Illustro will not be installed or updated on existing Rainmeter installations, only on new installations, and this change should be manually made if Illustro is currently being used.
PCRE Regular Expressions: Added UCP support to the regular expression library, to enable \X \P \p in expressions.
Net measures: Added a new option to return the value of NetIn / NetOut / NetTotal measures in bits rather than the default bytes.
Formulas: Added new math function to convert radians to degrees.
Shape meter: Added Path1 alternative of the Path shape. It will use a different form of the when the shape is filled with a color or gradient. This determines what parts of a shape with intersecting segments are «inside» the shape and what are «outside», for purposes of filling the shape with the defined color or gradient. See for details.
Bitmap meter: Changed the allowable measure value when from a C-language int data type (2,147,483,647 maximum) to int64 (9,223,372,036,854,775,807 maximum).
Variables: New built-in variable. The path and executable for the text editor defined in in Rainmeter settings, or the text editor associated with .ini files in Windows. The default will be Windows Notepad.exe.