Как снять защиту от записи с флешки usb
Содержание:
- Fix 5. Remove Write Protection with CMD Alternative
- Как форматировать диск
- Part 2. How to Format Write Protected USB Pen Drive after Fixing the Error
- Программное снятие защиты от записи
- Убираем защиту от записи с USB в редакторе реестра Windows
- Как снять защиту от записи с флешки (появляется ошибка, что диск защищен от записи)
- Не форматируется флешка что делать?
- Fix 1. Remove Write Protection with Physical Switch (SD Card/USB)
- Wrapping things up
- People Also Ask
- The Causes
- Как снять защиту от записи с флешки — атрибут «только чтение»
- Важность флешек в нашем мире
- Fix 2. Remove Write Protection by Killing Viruses
- Убираем защиту от записи с USB в редакторе реестра Windows
- How to Format Write-protected USB Pen Drive in Windows
- Не форматируется флешка диск защищен от записи?
- 5. DiskPart Command Prompt Utility
- How to solve SSD write-protected issue with 4 methods?
- Change write protection through Windows registry
- Bonus Tip: Format the USB Flash Drive/SD Card
- 3 Efficient Ways to Fix Device Media Write Protected Error(Video guide included in the end)
Fix 5. Remove Write Protection with CMD Alternative
If you don’t consider yourself a pro-computer user and you’re not familiar with command-lines, don’t worry. There are graphical-based solutions to help you remove write-protection from your hard drives, USB drives, and even SD cards.
EaseUS CleanGenius is one of these tools that helps you fix aforementioned issues on your drives without knowing a thing about command-line.
Here’s an easy-to-follow guide on how to use this tool to get your issues sorted:
Step 1: DOWNLOAD and install EaseUS CleanGenius (free) on your computer.
Step 2: Run EaseUS CleanGenius on your PC, select Optimization and choose the Write Protection mode.
Step 3: Select the device that is write-protected and click Disable to remove the protection.
Как форматировать диск
Необходимо внимательно подходить к этому пункту, чтобы избежать случайного удаления информации с жесткого диска. Форматирование флешки, которая защищена от записи, проводится по отличному пути от стандартного.
Алгоритм действий включает в себя 2 шага:
- Идентификация устройства.
- Использовать подходящее ПО.
Для каждого из шагов есть несколько утилит, которые смогут справиться с поставленной задачей.
Для идентификации карты используют:
- Flash Drive Information Extractor . Для получения полной информации о флешке достаточно запустить программу и нажать одну кнопку. Диагностика занимает не более половины минуты. Если во время диагностики программа перестала отвечать, то нужно вытащить флешку, и будет выдана необходимая информация.
- ChipGenius . Программа постоянно обновляется разработчиками для работы со всеми флешками. Диагностика может проводиться не только для USB-флешек, но и для плееров и microSD.
- CheckUDisk . Старая программа, которая давно не обновлялась. Лучше всего работает со старыми флешками.
Для форматирования устройства используют следующие бесплатные утилиты:
- AlcorMP . Версия программы выбирается в зависимости от контроллера. Для использования не требуется установка, но это не влияет на количество возможностей утилиты. Перед форматированием необходимо настроить AlcorMP. Может не определять некоторые флешки, поэтому нужно подобрать сборку программы, так для Oltramax потребуется пытаться провести форматирование сразу несколькими версиями. То, почему так происходит, зависит от внутренних настроек каждой версии, определяемых индивидуально под определенные карты.
- Kingston Format Utility . Простой интерфейс. Работа возможна только с флешками от Kingston, другие носители не видит.
- HP USB Disk Storage Format Tool . Простая программа, в которой нужно только выбрать файловую систему и начать процесс.
- Silicon Power Low Level Formatter . Подойдет для флешек, использующих контроллер Phison, например, Sundisk.
Part 2. How to Format Write Protected USB Pen Drive after Fixing the Error
Usually, Disk Management or Windows File Explorer can format a device that is in a normal state. But if the storage device is in a special state, such as displaying as I/O device error, Windows was unable to complete the format, USB cannot be formatted, etc., you will need a professional all-in-one formatting tool.
EaseUS Partition Master is capable of formatting your USB or pen drive, etc., from any the above logical errors. Besides USB flash drive, the program also allows you to format a write-protected SD card with the write protection error removed.
1 Year Lifetime$55.96$69.95
Black Friday, huge discount
Free DownloadWindows 11/10/8/7
100% secure
Here is the detailed guide:
Step 1. Launch EaseUS Partition Master, right-click the partition on your external hard drive/USB/SD card which you want to format and choose the «Format» option.
Step 2. Assign a new partition label, file system (NTFS/FAT32/EXT2/EXT3/EXT4/exFAT), and cluster size to the selected partition, then click «OK».
Step 3. In the Warning window, click «OK» to continue.
Step 4. Click the «Execute Operation» button in the top-left corner to review the changes, then click «Apply» to start formatting your external hard drive/USB/SD card.
When the formatting process finishes, you’ve finished the process of formatting a write-protected USB/pen drive on your own. And now, your device is in a good state for you to save and store data again.
Программное снятие защиты от записи
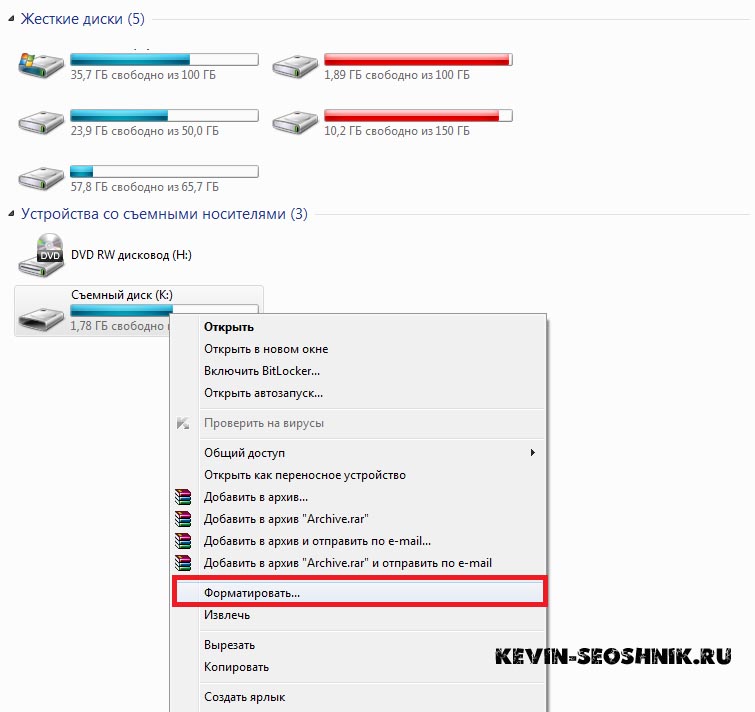
Убедившись в отсутствии механической проблемы защиты, приступаем к проверке программного обеспечения. Стандартно флешка форматируется с использованием файловой системы FAT32. Малое количество пользователей знают об ограничении в этой файловой системе на максимальный размер файла в 4Gb. Получается двоякая ситуация, формально разрешение на запись есть, но сообщение о невозможности выполнения таковой появляется. Имея необходимость переносить файлы большого размера, отформатируйте накопитель, используя NTFS – систему, где таких ограничений нет. Для этого откройте «Мой компьютер», нажмите правой кнопкой мышки на вашем съёмном диске и выберите «Форматировать». В появившемся окне, в строке «Файловая система» выберите NTFS, нажмите «Начать».
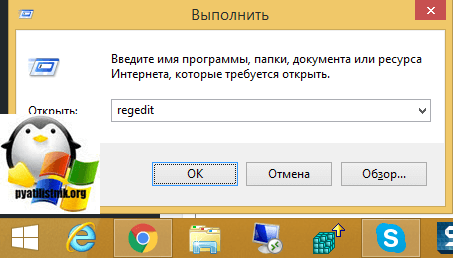
Блокирование может быть установлено в реестре Windows. Сочетание клавиш Windows+R, вызовет окно «Выполнить», введите regeditи кликните OK.
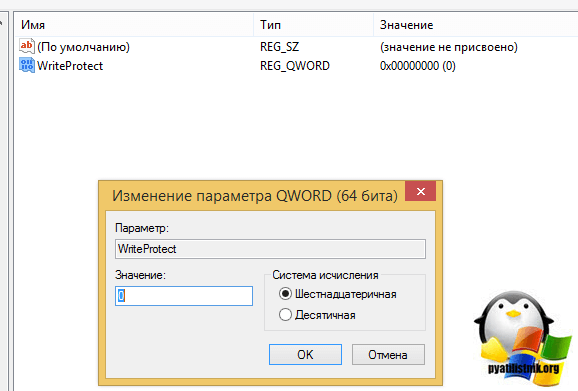
В окне редактора нужно перейти в секцию HKEY_LOCAL_MACHINE \ SYSTEM \ CurrentControlSet \ Control \ StorageDevicePolicies, где справа увидите параметр WriteProtect. Двойным кликом по параметру вызовите диалог изменения параметра, установитезначение 0. Раздел StorageDevicePolicies может отсутствовать и придётся его создать. Для создания правой кнопкой мышки кликнитепредыдущий раздел Control, выбирайте «Создать > раздел», название должно быть StorageDevicePolicies. В пустой области правой части окна только что созданного раздела вновь нажмите правой кнопкой мышки, выделите в меню «Создать > Параметр DWORD», битность выберите 64 или 32, в зависимости от разрядности вашей системы. Назовите параметр WriteProtect и присвойте значение 0, как описано выше. Обязательно перезагрузитесь и проверяйте результат.
Удостоверьтесь в том, что запись на съёмные устройства не запрещена групповой политикой. Аналогично с запуском редактора реестра выполните gpedit.msc, что вызовет «Редактор локальной групповой политики». Пройдите по веткам «Конфигурация компьютера — Административные шаблоны — Система — Доступ к съёмным запоминающим устройствам». Справа проверьте параметр «Съёмные диски: Запретить запись». Он должен быть отключен или не задан. Если параметр включен, дважды кликните по нему, выберите «Отключить» и примените выбор. Перед проверкой не забудьте перезагрузиться.
Проверьте систему хорошим антивирусом со свежими базами. Есть некоторое количество вредоносных программ, блокирующих возможность нормальной работы с подключенными переносными устройствами хранения информации.
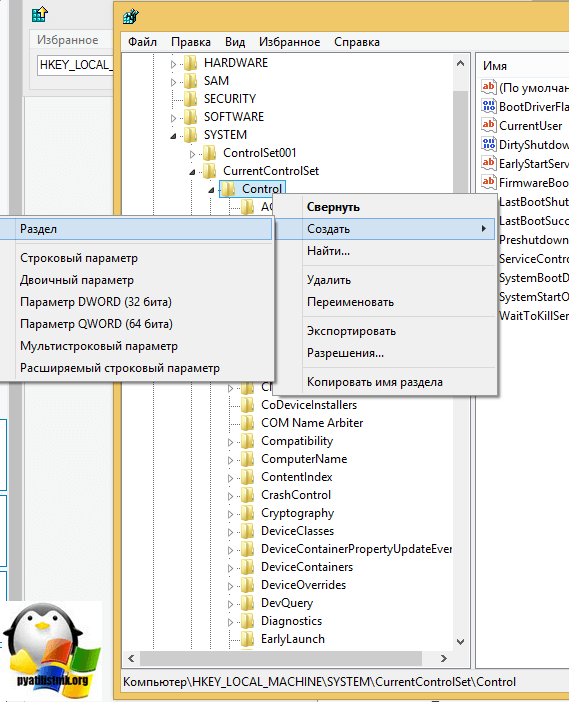
Убираем защиту от записи с USB в редакторе реестра Windows
Для первого способа исправить ошибку потребуется редактор реестра:
- Для его запуска вы можете нажать клавиши Windows + R на клавиатуре и ввести regedit, после чего нажать Enter.
- В левой части редактора реестра вы увидите структуру разделов редакторе реестра, найдите разделУчтите, что этого пункта может и не быть, тогда читаем дальше
- Если этот раздел присутствует, то выберите его и посмотрите в правой части редактора реестра, есть ли там параметр с именем WriteProtect и значением 1 (именно это значение может вызывать ошибку Диск защищен от записи). Если он есть, то кликните по нему дважды и в поле «Значение» введите 0 (ноль). После чего сохраните изменения, закройте редактор реестра, извлеките флешку и перезагрузите компьютер. Проверьте, была ли исправлена ошибка.
- Если такого раздела нет, то кликните правой кнопкой мыши по разделу, находящемуся на уровень выше (Control) и выберите «Создать раздел». Назовите его StorageDevicePolicies и выберите его.
- Затем кликните правой кнопкой мыши в пустой области справа и выберите пункт «Параметр DWORD32» (даже для x64 Windows). Назовите его WriteProtect и оставьте значение равным 0. Также, как и в предыдущем случае, закройте редактор реестра, извлеките USB накопитель и перезагрузите компьютер. После чего можно проверить, сохранилась ли ошибка.
Дополнительно, проверьте 2 раздела реестра
По умолчанию такой раздел отсутствует в реестре (и, если у вас его нет — значит дело не в нем)
При наличии раздела RemovableStorageDevices, обратите внимание на вложенный подраздел и содержащиеся в нем Deny_Write, Deny_Read, Denya_Execute, при значении этих параметров равному 1, они запрещают запись, чтение и выполнение со съемных накопителей
Удалите такие параметры — это должно снять защиту от записи. Перезапустите компьютер (может оказаться достаточным отключить и заново подключить флешку): проблема с защитой флешки от записи должна быть решена.
Как снять защиту от записи с флешки (появляется ошибка, что диск защищен от записи)
Вопрос от пользователя
Здравствуйте.
Пытаюсь записать на флешку один документ Word с жесткого диска, но появляется ошибка, что диск защищен от записи. Раньше никогда такого не было, флешку не ударял, не ронял, ничего с ней не делал…
Что интересно, попытался удалить какой-нибудь файл с флешки: появилась точно такая же ошибка, доступа нет. Т.е., по сути, я могу только копировать уже записанные ранее данные с флешки. Подскажите, как удалить эту ошибку?
PS Windows 7, флешка USB Kingston на 8 ГБ (самая обычная)
Здравствуйте.
Подобная ошибка может быть вызвана несколькими причинами: аппаратной неисправностью флешки (например, если вы ее перед этим случайно уронили), при вирусном заражении, при “ручной” установке защиты от записи и пр.
В этой статье я рассмотрю последовательно все популярные причины (вызывающие эту ошибку) и способы их устранения. Думаю, что, представив статью в подобном формате, и вам и другим пользователям с такой же ошибкой, будет проще и легче решить проблему.
И так…
Не форматируется флешка что делать?
Немного нужных подсказок, с чем я сталкивался в своей деятельности.
- Первым делом желательно вспомнить были ли механические удары, были ли воздействие влаги (воды). Это очень важный момент.
- Также флешка может быть заражена вирусом .Для этого стоит попробовать отформатировать её на другом компьютере.
- Также можно поиграться с разъёмами (засуньте в другой порт, желательно на другом компьютере.)
- Просканируйте каким нибудь антивирусом. (Аваст ,Касперский)
В моей практике были и такие случаи:
Засунул флешку в ucb разъём ноутбука и немного надавив на корпус флешки в низ. Индикатор (лампочка) заморгала. (Начался процесс обмена данными (синхронизация). Оказалось что плохие контакты.
В роде не значительные действия, но помогло мне выявить причину поломки.
P.S. Возможно утилита HP USB Disk Storage Format Tool , JetFlash Recovery Tool, Flash-Doctor, не помогут вам восстановить поврежденную флешку.
Но сильно не расстраивайтесь, это только три способа форматирования и восстановления флешки из сотни .
Так же, есть еще пару качественных утилит. Есть еще онлайн сервисы, по определению чипсетов фирмы и т.д.
Но это уже совсем другая тема.
И не спишите выкидывать или нести в ремонт ваши гаджеты. Всё в ваших руках.
Fix 1. Remove Write Protection with Physical Switch (SD Card/USB)
We use removable storage devices a lot on a Windows computer, and some of you may encounter the issue of the disk malfunction, which is mostly about «the disk is write-protected». When Windows starts to write-protect your disk, for example, a SanDisk 4GB USB flash drive, you can no longer use it anymore until you remove the write protection. But you can easily solve this problem if you have a physical switch.
Some USB flash drives and SD cards have physical switches on the side to protect data. If the USB drive or SD card switch is locked, the device could become write-protected on all PC or devices. You can get out of this problem by turning off the switch.
Step 1. Find the physical switch on your USB or SD card.
Step 2. Remove the physical switch from ON to OFF and unlock the device.
Unlock SD card with the physical switch
Unlock USB with the physical switch
Wrapping things up
To fix Diskpart has encountered an error the media is write-protected, you can try to change the value of the Writeprotect key in Registry, type attributes disk clear readonly first and then clean, repair corrupted file system of the media, change the read-only mode from Yes to No.
If none of the above methods works for you, you can try the last one – formatting partition with AOMEI Partition Assistant. With it, all things become easy. You do not need to learn the complicated commands, which will lead to data loss if one of the processes goes wrong. In this software, all steps are fixed and there is little risk to make a mistake.
People Also Ask
Below, we have listed some frequently asked questions and their answers to help you remove write protection from your storage devices.
1. How to remove write protection from the Micro SD card?
To remove write protection from your SD card, follow the quick guide below:
- 1. Run Command Prompt as administrator.
- 2. Type diskpart.exe.
- 3. Type list disk.
- 4. Type select disk + number.
- 5. Type attributes disk clear readonly.
For a more detailed guide, follow How to Remove Write Protection and Format Write-Protected SD Card guides.
2. How can I remove the write protection from a single file?
If your file or folder is locked with a read-only state, you can unlock it from the write protection state with the following tips:
- Right-click on the folder, select Properties.
- On the General tab, uncheck Read-only next to the Attributes section.
- Click OK.
3. How do you add write protection to a flash drive?
There are three ways to enable write protection on a USB flash drive:
- Use USB write-protection switch.
- Use diskpart to change read-only settings.
- Change security permission in USB properties.
4. How do I remove write protection from Seagate external hard drive?
Connect your Seagate external hard drive to your PC and remember its disk number. Open Command Prompt, type the following command one by one, and hit Enter each time:
- diskpart
- list disk
- select disk n (Replace n with the disk number of your write-protected Seagate external hard drive.)
- attributes disk clear readonly
Once you’re done with this, if you find any files are missing on the disk, consider using reliable a USB data recovery tool to recover your valuable files.
The Causes
The cause of SanDisk write protection error varies, you should find the root cause for SanDisk write protected, then fix it.
These causes should take responsible for the Write protection error:
1. Write protect switch is on the lock position. Please unlock SanDisk microSD card, USB flash drive, etc.
2. The device is infected by virus, and other attack.
3. The file system is corrupted due to some unknown reason.
4. The value of Windows registry key is incorrect.
5. Your Sandisk USB drive, flash drive, SD card, SSD or pen drive is dead.
Thus, you should know the most urgent thing is to remove the write protection. How to remove?
Как снять защиту от записи с флешки — атрибут «только чтение»
Если система не при чем, то ошибка записи на диск флешка может возникать из-за установленного на носителе атрибута «read only». Проверить это можно следующим образом:
Так мы запустим утилиту работы с дисками. Далее необходимо вывести на экран перечень всех накопителей. Воспользуемся командой:
В полученном списке видим нашу флешку и запоминаем её идентификатор (например, disk 0). Это нам пригодится для команды:
Так мы осуществили выбор диска:
Осталось только сбросить все измененные атрибуты к базовым параметрам. Вводим:
attributes disk clear readonly
Можно убрать окно консоли и снова попытаться что-то скопировать на диск. Если же по прежнему при записи на флешку выдает ошибку, это может указывать на физическое повреждение или нарушение в работе файловой системы. В первом случае Вы уже ничего не измените. А вот для исправления файловой таблицы можно выполнить форматирование.
Важность флешек в нашем мире
Новые технологии и глобальный переворот в мире техники , за последние десять лет. Просто заставляют нас с вами пользоваться «USB-накопителями», «жёсткими дисками» и ssd.
Но к сожалению, не что не вечно. Какие то сбои, поломки, заставляют нас приобретать новые «гаджеты», а старые выкидывать или сдавать в ремонт.
Так и в нашем случае, usb флешка не форматируется привычным для нас способом.
Остается либо сдать в ремонт, где с нас срубят половина стоимости самого девайса, либо к сожалению выкинуть и купить новую. Но этот вариант затронет ваши финансы.
А представляете, если китайские флешки будут ломаться постоянно.
Погоня за дешевизной и не качественной китайской сборки и не факт, что ваша флешка прослужит долго .
Так и придется постоянно покупать или ремонтировать.
Нет, я предлагаю перед тем как выкинуть ваш девайс, попробовать самим отформатировать флешку специальными программы.
- Это не так трудно. Не нужно быть профи в компьютерной тематике.
- Займет не много времени.
- А главное бесплатно
В материале представлю полное описание с картинками и полное руководство.
И так начнем восстанавливать наш девайс в нормальное рабочее состояние. По крайней мере постараемся.
Если у вас на флешке, нет важных материалов, то приступаем к форматированию.
JetFlash Recovery Tool — Как восстановить usb флешку
Fix 2. Remove Write Protection by Killing Viruses
The next thing is checking and killing USB flash drive, SD card, or hard drive viruses. When you connect your storage media to your computer, it can be infected and attacked by viruses easily. The pen drives and SD cards can be locked or attacked after downloading from an illegal website. The data would be locked or becoming inaccessible, which can lead to the «disk is write-protected» error.
On this occasion, you need to find reliable anti-virus software to check and kill viruses. If you don’t have one, you can download or transfer anti-virus software to your computer to do this job. Take Avira as an example:
Step 1. Download and launch Avira.
Step 2. Open this software and click «Run a quick scan».
Step 3. Wait for the process to complete.
Убираем защиту от записи с USB в редакторе реестра Windows
Данный метод поможет в 99 процентах случаев, когда у вас флешка видится, но не дает ничего на себя записать. Тут вся проблема в одном ключе реестра, который нужно поправить или создать заново. И так, нажимаем одновременно кнопки Win и R, и в открывшемся окне «Выполнить» пишем regedit.
Переходите в раздел:
Если такого раздела не будет, то вам придется его создать через правый клик и задать ему имя StorageDevicePolicies
В разделе StorageDevicePolicies вам необходимо создать ключ реестра «Параметр QWORD (64 бита)» с именем WriteProtect и дать ему значение 0.
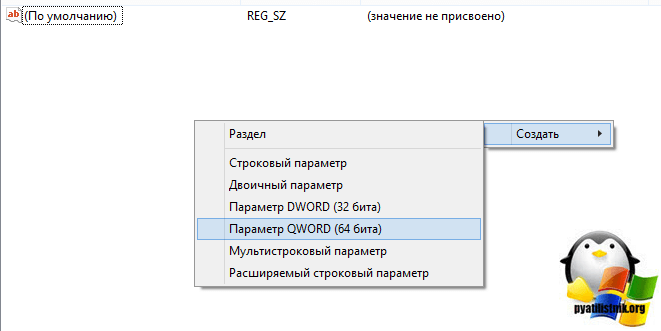
Если ключ WriteProtect уже был у вас в реестре и имел значение 1, то это он запрещал форматирование флешки и писал, что диск защищен от записи, меняем на ноль.
После внесения изменений в реестр, вам необходимо перезагрузить компьютер, иначе настройки не вступят в силу.
How to Format Write-protected USB Pen Drive in Windows
To format write-protected USB pen drive in Windows 11/10, follow these steps:
- Use write-protection switch
- Bypass write-protection using Registry
- Remove write-protection using DISKPART command
To learn more about these steps, continue reading.
1] Use write-protection switch
Some USB pen drives and SD cards come with a write-protection switch that turns on or off the protection as per your needs. Although it is not a safe feature to have on your device, some devices do have it. If your USB pen drive or SD card has a write-protection switch attached to it, you can use it to get the job done. All you need to do is to slide the switch to the other end to turn the protection off. Following that, you can use the native Format option in File Explorer to format the device.
2] Bypass write-protection using Registry
You can create a Registry key in a specific location to disable write protection from your USB device. For that, do the following:
Press Win+R to open the Run prompt.
Type regedit and hit the Enter button.
Click on the Yes option.
Navigate to this path:
HKEY_LOCAL_MACHINE\SYSTEM\CurrentControlSet\Control
Right-click on Control and select New > Key.
Name it as StorageDevicePolicies.
Right-click on StorageDevicePolicies and select New > DWORD (32-bit) Value.
Name it as WriteProtect.
Keep the Value data as .
Restart your computer and format the USB pen drive.
This method is probably the easiest when your device doesn’t have a physical write-protection switch.
3] Remove write-protection using DISKPART command
If the Registry method doesn’t work for you, you can always use the diskpart command in Command Prompt to remove the read-only attributes of a write-protected USB pen drive. For that, do the following:
- Follow this guide to open the elevated Command Prompt window.
- Plug in your USB device to your computer.
- Enter the diskpart command.
- Type list disk command to find out the list of all attached storage devices.
- Note down the disk number and enter this command: select disk
- Enter this command: attributes disk clear read-only
- Close the Command Prompt window.
Now you can open the File Explorer and use the in-built Format option to format the pen drive.
How do I remove write protection on a USB drive?
There are multiple ways to remove write protection on a USB drive. For example, you can create the WriteProtect DWORD value in the StorageDevicePolicies sub-key in Registry Editor. Also, you can use the DISKPART utility to remove the read-only attributes.
How do you write-protect USB drive Windows 10?
You can use USB Write Protect, a tool to write-protect USB flash drives on Windows 11/10. It is the easiest method to write protect a USB pen drive, SD card, etc., on your Windows computer.
That’s all! Hope it helped.
Read: Can’t format USB Drive in Windows.
Не форматируется флешка диск защищен от записи?
Как обычно вставляем USB-накопитель в разъём .Начинаем копировать с флешки данные (музыку, фильмы и т.д.) на компьютер.
И компьютер выдает нам, вот такую табличку.

А как снять защиту?
Большинство пользователей подумают. И о какой защите вообще идет речь. Вроде не ставил пароли и не как не защищал.
Следующим шагом мы идем в компьютер и пробуем отформатировать защищенную флешку, обычным для нас способом .
Но и тут не удача.

Диск защищён от записи. Словно приговор!
Все усилия проделаны, но устройство также остается не доступной для форматировании. Обычно дальше следует выкинуть, разбить, утопить.
Но давайте попробуем её отформатировать с помощи специальных программ. В некоторых случаях, это может помочь.
5. DiskPart Command Prompt Utility
Are you familiar with the Command Prompt? Well, you’re about to familiarize yourself a little bit more. Don’t worry, it really isn’t scary, and is the next logical step in our effort to fix your USB stick.
Hit Windows key + X, and select Command Prompt (Admin) from the menu. Type diskpart, and press Enter (1. in the below image). Next, type list disk, and press Enter. You should see a list of currently mounted disks, like so (2. in the below image):
Make sure you can see your USB drive. Mine is Disk 4. Make a note of your disk number. Now enter the following command:
Once selected, enter the following command:
You’ve cleared any remaining read-only file attributes from the USB drive.
How to solve SSD write-protected issue with 4 methods?
Firstly, run anti-virus to check whether your SSD is affected by virus. If your SSD being read-only isn’t related with virus infection, you can check the following 3 ways about how to change SSD from read-only status to normal. You should choose one or more methods according to your specific situation.
Method 1. Remove write protection from SSD using CMD
If your SSD has been set to be read-only in Diskpart accidentally, you can disable it for the SSD using CMD. Here are the steps below.
Step 1. Press «Win+R» to open Run dialogue and type «CMD» press «Enter» to open Diskpart.
Step 2. Type «list disk» and hit Enter to get information of every disk.
Step 3. Type «select disk n» and press «Enter» («n» is the number of your SSD drive on your computer).
Step 4. Type «attributes disk clear readonly» and hit «Enter».
Then you can try to access the SSD to see if the «SSD write-protected» issue is solved.
Method 2. Solve SSD write protected issue via Registry Editor.
Incorrect value number of Windows Registry Key is another reason why a SSD get write-protected. Follow these steps and try to reset the value data on Registry Editor to remove write protection.
Step 1. Press “Win +R” to start Run, and type “regedit” to open Registry Editor.
Step 2. Navigate to the following path on the left window:
Computer\HKEY_LOCAL_MACHINE\SYSTEM\CurrentControlSet\Control\StorageDevicePolicies.
Step 3. Double-click the «WriteProtect» and change the Value Data from “1” to “0”.
Then click “OK” to save. Reconnect your SSD to computer, your SSD should not be write protected any longer.
NoteIf you can’t find the StorageDevicePolicies under Control in step 2.
1. Right-click the “Control” and choose “New>Key” to create a new key, name it with StorageDvicePolicies.
2. Click the new key, and right-click on the blank space, choose “New”> “DWORD (32-bit) value” name it with «WriteProtect».
3. Right-click on Writeprotect, choose “Modify”, change the Value data to «» in the prompt window.
If this method doesn’t help you out, go to the method 3.
Method 3. Check bad sectors on the SSD
Sectors are the smallest storage unit on a drive. If there are some bad sectors on an SSD, the read-only protection can be triggered. You can turn to a professional SSD repairing software-AOMEI Partition Assistant Standard. It is featured with «Check Partition» that scan through all sectors via CHKDSK checking program and repair the sectors aucomatically.
Install the tool, and follow the steps below.
Download Freeware Win 11/10/8.1/8/7/XP
Secure Download
Step 1. Open this AOMEI Partition Assistant, you will see all connected storage devices will demontrated on the main interface. Right-click on the partition on the SSD, and choose «Check Partition».
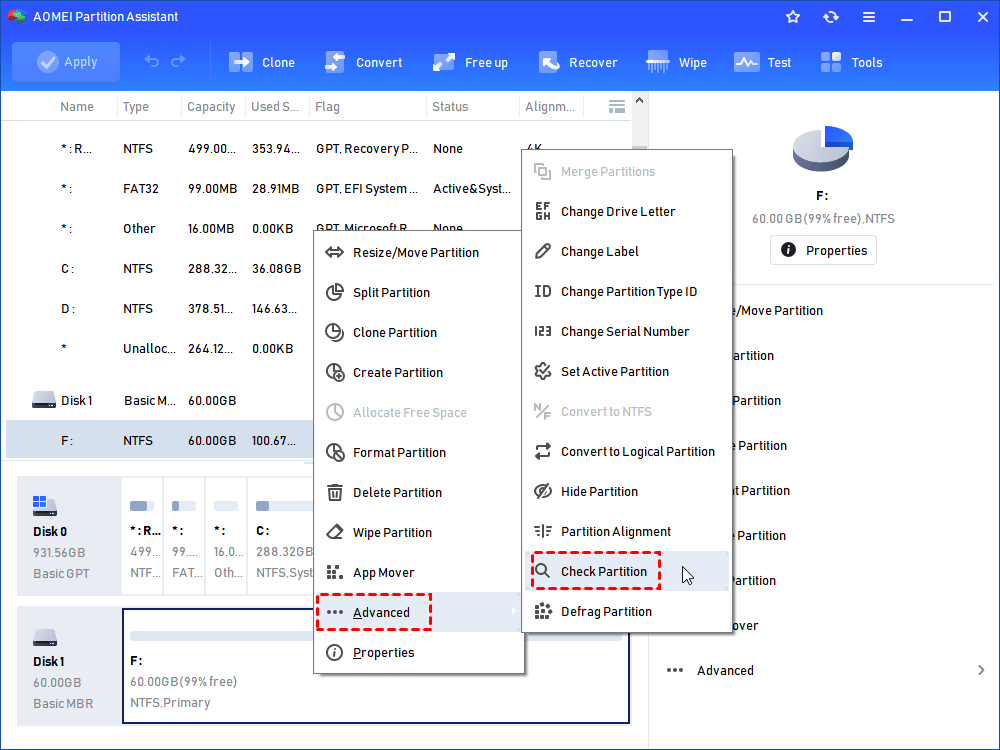
Note: If your SSD contains more than one partition, you can right-choose the whole drive and click «Surface Test».
Step 2. Tick «Check partition and fix errors in this partition by using chkdsk.exe», and hit «OK».
Step 3. The program will start scaning all sectors, you can see the progress on this window. When it is finished, click «OK» .
Method 4. Format write-protected SSD with AOMEI Partition Assistant.
File system corruption is another cause for it. If all the methods mentioned can’t solve the write protected issue, you may need to format the SSD to rebuild the file system. And AOMEI Partition Assistant can also help you to format a drive to NTFS, FAT32, Ext2, Ext3, Ext4 file systems.
Warning: Formatting will delete all your data on SSD drive. Before this operation, you should backup the SSD.
Step 1. Download AOMEI Partition Assistant, install and open it. Right-click the read only SSD partition and select “Format Partition”.
Step 2. Select a compatible file system on the prompt window, here we select NTFS. And click “OK”.
Step 3. In the main interface, click “Apply”> “Proceed” to execute the formatting operation.
Change write protection through Windows registry
You can enable or disable write protection on your USB flash drive through the Windows registry by following the steps below.
- Open the Windows Registry Editor.
How do I open and edit the Windows registry?
- Navigate to the following registry location.HKEY_LOCAL_MACHINE\SYSTEM\CurrentControlSet\Control\StorageDevicePolicies
- Double-click the WriteProtect key.
- To enable write protection, change the WriteProtect value to 1 and click OK.To disable write protection, change the WriteProtect value to and click OK.
- Close the Windows Registry Editor and restart your computer.
How to restart Microsoft Windows.
Bonus Tip: Format the USB Flash Drive/SD Card
After you have tried the 6 solutions above, you may have fixed the «the disk is write-protected» error. To avoid this situation and make your external devices work well, you can format them. If you fail to solve your problem, you can try to format the device to solve your case.
To solve your problem, powerful USB drive formatter — EaseUS partition software is recommended. It can format your HDD, SSD, USB, memory card, SD card, or delete a partition to make it available for reuse. Follow the steps below to format your USB drive now.
1 Year Lifetime$55.96$69.95
Black Friday, huge discount
Free DownloadWindows 11/10/8/7
100% secure
Check the video tutorial to format SD card/USB to FAT32/NTFS:
Step 1. Select the USB drive to format.
Connect the USB drive or pen drive to your computer. Download and launch EaseUS partition software. Right-click the USB drive you intend to format and choose «Format».
Step 2. Set the drive letter and file system on USB.
Assign a new partition label, file system (NTFS/FAT32/EXT2/EXT3/EXT4/exFAT), and cluster size to the selected partition, then click «OK».
Step 3. Check «OK» to confirm formatting USB.
Click «OK» if you see the Warning window. If you have important data on it, back up the data in advance.
Step 4. Apply the changes.
Click the «Execute operation» button first, and then click «Apply» to format the USB drive.
If you lost data after formatting, you can run EaseUS data recovery software. It can restore data from SD card, recycle bin, hard drive, USB flash drive, and more. No matter how you lost your data, you can always get back files with simple steps.
3 Efficient Ways to Fix Device Media Write Protected Error(Video guide included in the end)
Way 1 — Turn off the write protection switch if it was locked
Way 2 — Convert the media no matter usb stick or memory card to be MBR with diskpart
Here are some pre-steps that you need to get it done.
- Step1 — open cmd by pressing ‘Windows icon + R’ on your keyboard to start Run
- Step2 — type ‘diskpart’ to open the diskpart function
CMD to convert media MBR to get the write protection problem fixed
- Step1 — type ‘list disk’
- Step2 — type ‘select disk *’ (* you may need to replace * with the drive letter of your media)
- Step3 — type «convert mbr»
Note: if it does not work and reports some message like ‘The sepecified disk is not convertible’, here is another step that shall be added before the Step3.
- Step2.5 — type ‘clean’
The above step2.5 is to fix the error when it was not working with the convert MBR.
Remove hp usb format tool write protected with cmd
Remove hp usb format tool write protected with cmd
Video Guide — how to remove media is write protected error in HP USB Disk Storage Format Tool
Way 3 — Remove the write protection with cmd Attrib disk clean Readonly
Besides the above way2 method, you may also try the following cmd to remove the read-only attribution on your pendrive or disk.
Remove HP usb format tool write protection readonly attribution
You need to get your media connected to your computer at first, and then start cmd and here are the steps.
- list disk
- select disk * (You need to replace * with the drive letter of your media to remove the write protection error)
- attributes disk clear readonly
- exit
Or sometimes you may also use ‘attrib disk clear readonly’ as an alternative in the above steps when it comes to the step 3.
Tired with HP USB Format Tool? Try the following free alternatives
- 7 Free HP USB disk storage format tool alternatives and format methods
- HP USB Disk Storage Format Tool Review
Last updated on June 30, 2021
Hot Articles
File Recovery Free > Format Recovery Utility > Howto >HP USB format tool media is write protected
Best Data Recovery
Popular on iCare
Pen drive raw recovery Posted by MikeВ·August 02
Copyright 2009-2021 iCare Recovery by iCareAll Co, Limited. ALL RIGHTS RESERVED.