How to install macos monterey on vmware on windows
Содержание:
- Как можно протестировать новую macOS Big Sur
- VMware macOS Unlocker
- Create macOS virtual machine
- Download OS X
- Add macOS image
- Steps to Install VMware Tools on macOS Big Sur
- Installing Mac OS as a Guest OS on a VMware VM
- Install macOS Catalina 10.15 on VMware on Windows PC
- Как бесплатно установить Windows 10 Technical Preview на Mac при помощи VMware Fusion
- Install macOS Unlocker on Windows 10 for VMware Workstation 11/12/14/15
- Нюансы использования новой системы на виртуальной машине
- Подготовка виртуальной машины с помощью VMware
- macOS Big Sur Virtual Machine Installation Complete
- What Files Do You Need to Create a macOS Virtual Machine on Windows 10?
- О VMware Fusion и Parallels Desktop
Как можно протестировать новую macOS Big Sur
Есть несколько способов попробовать поработать в новой операционной системе Apple и лично поюзать каждую из фишек macOS 11.
➊ Можно установить систему прямо на свой Mac. Делается это довольно просто, инструкция есть в начале этого поста.
Обновить систему до новой бета-версии несложно, однако, мы настоятельно не рекомендуем делать это на вашем основном Mac. Вы рискуете получить неработоспособный компьютер или систему с глюками и проблемами. С вероятностью 90% вам придется восстанавливать операционную систему и накатывать свой последний бекап macOS Catalina.
➋ Можно выделить место на системном диске и установить Big Sur в качестве второй системы. Для этого придется разбивать накопитель на пару контейнеров в дисковой утилите и предельно внимательно производить установку, чтобы не затереть основную систему.
Владельцы Mac с накопителем на 128 ГБ могут сразу забыть об этой затее, для корректной установки и дальнейшей работы придется выделить минимум 50-60 ГБ места. Далее будете вынуждены постоянно перезагружать Mac и переключаться между тестовой Big Sur и рабочей Catalina, что тоже не совсем удобно.
➌ Можно установить бета-версию macOS 11 на виртуальную машину. При этом вы не рискуете затереть свои рабочие данные или потерять их в случае сбоя, а работать Big Sur будет прямо внутри macOS Catalina.
Разумеется, часть производительности Mac пойдет на нужды виртуальной машины, но при этом потратится меньше места на накопителе, а при необходимости все быстро вернется к первоначальному виду. Удаляем виртуальную машину и все – никаких восстановлений из резервной копии, переустановок системы или возни с дисковой утилитой.
VMware macOS Unlocker
By default, VMware does not provide the option to create macOS and Mac OS X machines. Fortunately there is a tool that helps me unlock this option, this tool is VMware macOS Unlocker. It supports Windows, Linux and MacOS. Skip this step if you were able to create a macOS virtual machine.
- Go to the VMware macOS Unlocker page to download. Click the Clone or download button, then click Download ZIP.
- Power off all virtual machines running and exit VMware.
- Extract the downloaded .zip file in step 1.
- On Windows, right-click on the win-install.cmd file and select Run as Administrator to unlock. For Linux and macOS, run the lnx-install.sh or osx-install.sh files under root (not tested).
- After the unlock process is complete, run VMware to create the macOS virtual machine.
Create macOS virtual machine
Creating a macOS virtual machine is very simple, here are the steps to create a virtual machine on VMware Workstation:
- Click File, select New Virtual Machine…
- Select Typical (recommended) and click Next.
- Select I will install the operating system later. and click Next.
- Select Apple Mac OS X in the Guest operating system section and select macOS 10.14 in the Version section. Click Next.
- In the Name the Virtual Machine window, name the virtual machine and virtual machine directory. I personally would put it on a different drive than the system drive.
- Select the size for the new virtual disk in the Specify Disk Capacity window. This is the virtual disk to be installed macOS. Click Next and then Finish.
Download OS X
You can install OS X Lion, Mountain Lion, Mavericks, Yosemite, or El Capitan into a virtual machine on your Mac computer. Before you get started with the download method, you need to grab a copy of the OS X installer from the App Store.
To do this, open the App Store and download your version of OS X. In my example, I am running El Capitan, so that is what I will download. It’s listed on the right hand side in the list of links.
Click the Download button and the install app will be downloaded to your Applications folder in OS X. The download will be several GBs in size, so it could take a while for the download to complete.
Add macOS image
After creating the virtual machine, we have a virtual disk to install macOS Mojave. Now we just need to add a new virtual disk containing the macOS installer. You can also create a macOS bootable USB, then boot USB in VMware Workstation to install but using a virtual hard disk will be a lot simpler.
- Download the OSX_10.14.0_Installer.vmdk file. This is an installation image of macOS Mojave. You do not need to use the Hackintosh ISO.
- Select the virtual machine just created, click on Edit virtual machine settings.
- In the Memory section, you can increase the value to make the virtual machine run faster. I increased it to 4096MB (4GB) but macOS still runs very slowly.
- Click Add…, then select Hard Disk and click Next.
- In the Select a Disk Type window, click Next.
- Select Use an existing virtual disk in the Select a Disk window and click Next to continue.
- In the Select an Existing Disk window, click Browse… to select the OSX_10.14.0_Installer.vmdk file that you downloaded in step 1.
- Click Finish, then click OK in the Virtual Machine Settings window.
Steps to Install VMware Tools on macOS Big Sur
- Attach VMware Tools ISO to macOS Big Sur
- Install the VMware tools
- Allow VMware tools from macOS Security Settings
- Reinstall the VMware tools if required
Step 1: Attach VMware Tools ISO to macOS Big Sur
In this guide, I will use the default VMware tools provided by VMware. Right-click on macOS Big Sur Tab/Window then click Install VMware Tools.

Attach VMware tools to macOS
Alternatively, if that didn’t work for you then download the VMware tools for macOS Big Sur from the link below then follow these steps:
- Download VMware Tools for macOS Big Sur (Direct Link)
- Go to your macOS Big Sur Virtual Machine Settings > CD/DVD (SATA) > Use ISO image file > Browse > locate & select the VMware Tools you downloaded from the link above and click Open.
- Once you have selected the VMware tools.iso, then make sure the device status is Connected and Connect at Power On and click OK.
Step 2: Install the VMware tools
#1. The VMware tools will automatically appear on your desktop. Double-click on Install VMware tools.

Install VMware Tools on macOS Big Sur
#3. On the Welcome to VMware tools Installer page, click Continue.

Click Continue
#4. Click on the Install button.

Click Install
#5. Type your username and password then click Install Software.

Click Install Software
Step 3: Allow VMware Tools through macOS Big Sur Security Settings
#1. When System Extension Blocked appears, click Open Security Preferences.

Open Security Preferences
#2. Click on the Padlock icon. Type your password then click Unlock. It allows you to make changes.

Unlock Security and Privacy Preferences
#3. Click Allow next to some system software was blocked from loading.
#4. Then select VMware, Inc and click OK to enable the VMware tools extension to be installed from the security & privacy window.

Select VMware Inc and click OK
#5. On this Pop-up window click Not Now then close Security & Privacy window.

Close Security & Privacy window
#6. Click the Restart button on The installation was successful window.

Click Restart
#7. macOS Big Sur VM will restart and after the restart login with your Username and Password. Test the enhanced features should be working.

VMware Tools installed on macOS Big Sur
Step 4: Reinstall VMware Tool if required
Sometimes the VMware tools don’t work when you install it the first time, so If the VMware tools didn’t work, then you need to reinstall it, to make it work. So follow the steps below.
- Attach VMware tools.
- Click on Install VMware Tools.
- Click on Continue.
- Click on Continue Installation.
- Type your Username and Password and Click Install Software.
- Click Restart.
- Login to macOS Big Sur.
- Full screen your macOS Big Sur to make sure it’s work properly.
If you’ve installed macOS Big Sur on Virtualbox then you can fix macOS Big Sur Screen resolution.
Installing Mac OS as a Guest OS on a VMware VM
After macOS installer has loaded, you should see the installation wizard.
- Select the main language and click the Next button. English is used in this installation example.
- To set up the installation of macOS, click Continue.
- Read the license agreement carefully. If everything is right and you accept the license agreement, click Continue. Then click the Agree button in the popup window on the top of the screen.
- Install macOS. In this step you must prepare a partition on your virtual hard disk. Click Utilities > Disk Utility.

Enter a name for your disk (vmdisk1 in this case), select a format (Mac OS Esxended (Journaled)), select a scheme (GUID Partition Map) and click Erase. After erasing the media, close the Disk Utility window.

Select the disk that you have prepared (vmdisk1) and click Continue.

- Wait until the macOS installer installs the operating system.
- Restart your machine to complete the installation of macOS on your disk (click the Restart button).
- Once your ESXi virtual machine has been restarted, customize your macOS. On the Welcome screen select your country and click Continue.
- Select your keyboard. Choose a keyboard layout and click Continue.
- Transfer information to This Mac. Select Don’t transfer any information now and click Continue.
- Enable Location Services. Do not check the box Enable Location Services on this Mac and click Continue. Click the Don’t use button in the popup window to confirm.
- Sign in with your Apple ID. Click Don’t sign in and click Continue. Click Skip in the popup window to confirm.
- Terms and conditions. Read terms and conditions carefully. If you agree with terms and conditions, click the Agree button. Click the Agree button once more to continue.
- Create a computer account. Enter a full user name, account name, password, and click Continue.
- Select your time zone. Click Continue.
- Analytics. Uncheck the boxes Share Mac analytics with Apple and Share crash data with app developers. Click Continue.
- Congratulations! Now your macOS Sierra is loaded and you can see a desktop of this operating system running on a VMware ESXi VM.
Install macOS Catalina 10.15 on VMware on Windows PC
Once again the virtual machine will restart when it restarted select your language and click continue.

Select your language
- Select your written and spoken language then click continue.
- On Data & Privacy simply click continue.
- Choose don’t transfer any information right now then click continue.
- Click sign up later and click skip.
- Agree to the terms and conditions of macOS Catalina pressing two times to agree on the button.
- Create a computer account by filling the full name, account name, password, and hint then click continue.

Create a computer account
- On express set up, click continue.
- Again on analytics click continue.
- And on the screen time click continue.
- Choose your look theme and click continue.
- Finally, macOS Catalina with the new method successfully installed on VMware Workstation. After login to macOS Catalina, the notification of its new update will appear. If you want to update click install, if don’t then click later option.

Installed macOS Catalina
Как бесплатно установить Windows 10 Technical Preview на Mac при помощи VMware Fusion
Что необходимо скачать:
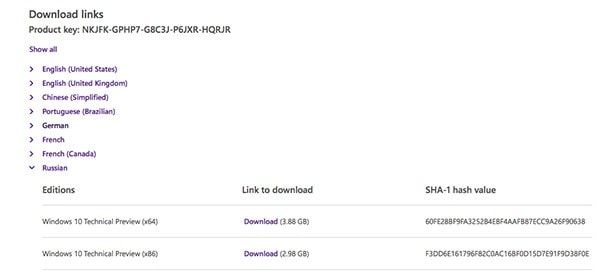
1. iOS-образ Windows 10 Technical Preview. Для этого пройдите на официальную страничку Microsoft, зарегистрируйтесь в программе Windows Insider Program (это легко и бесплатно) и скачайте 32- или 64-битный образ в зависимости от разрядности вашей системы. В среднем, размер iOS-файла будет равен 3—4 ГБ. Присутствует русскоязычная версия!
 2. DMG-файл виртуальной машины VMWare Fusion.
Предварительные шаги
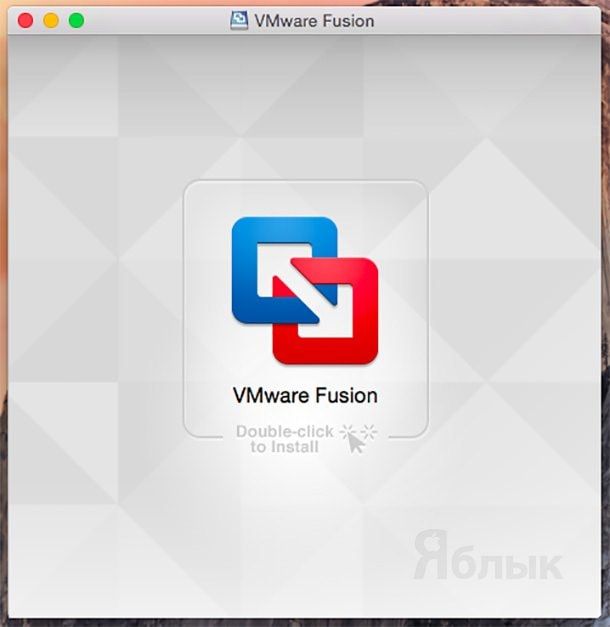
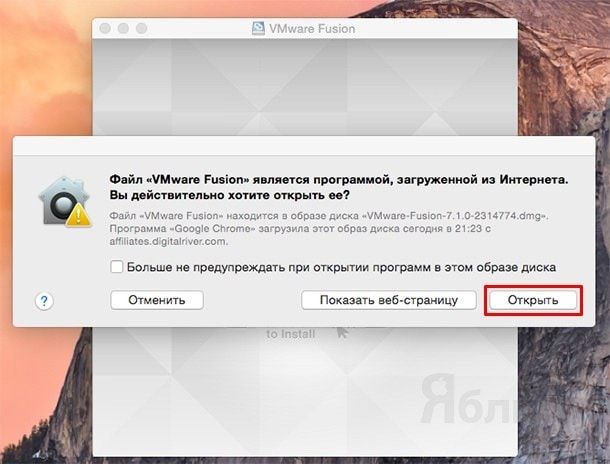
1. Смонтируйте DMG-образ VMWare Fusion и двойным щелчком мыши кликните по иконке программы.
 2. Так как эта программа из интернета, то во всплывающем окне нажмите «Открыть», после чего введите имя пользователя и пароль администратора Mac.
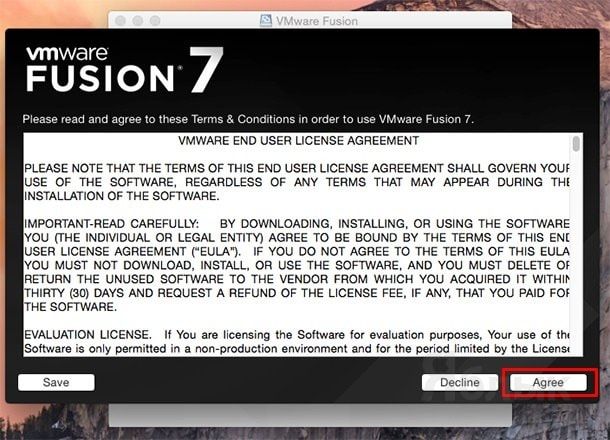
 3. После инициализации согласитесь с пользовательским соглашением нажатием кнопки «Agree«.
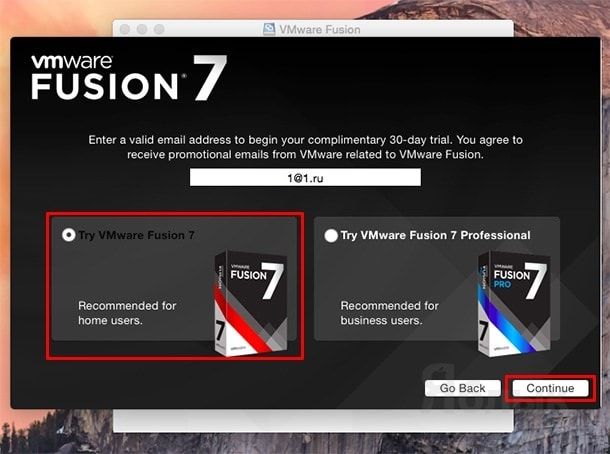
 4. Воспользуйтесь бесплатной 30-дневной trial-версией программы, поставив точку напротив «I want to try VMware Fusion 7 for 30 days«.
 6. После того, как вы решите, хотите помогать разработчикам VMWare или нет нажмите «Done«.
Установка Windows 10 Technical Preview на виртуальную машину VMware Fusion 7
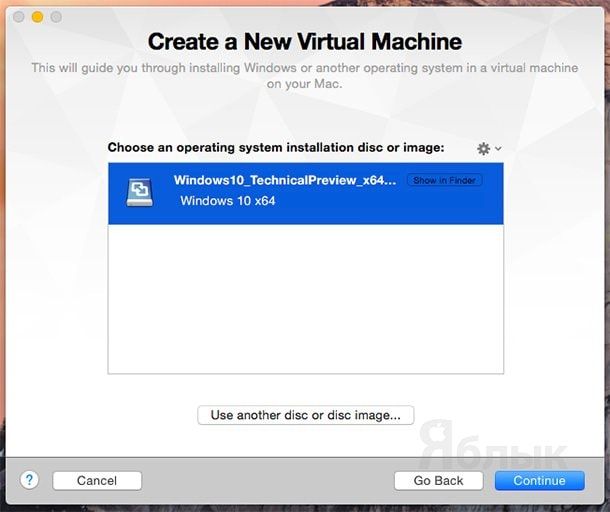
1. Выберите пункт «Install from disc or image» и нажмите «Continue«.
 2. Кликните по «Use another disc or disc image…» и укажите путь к скачанному образу Windows 10 —> Continue.
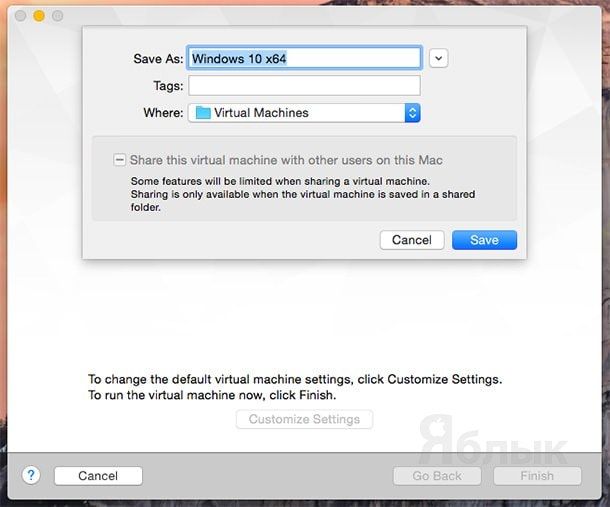
 3. Нажмите «Customize Settings» и сохраните *.vmwarevm-файл в папку ~/Documents/Virtual Machines.
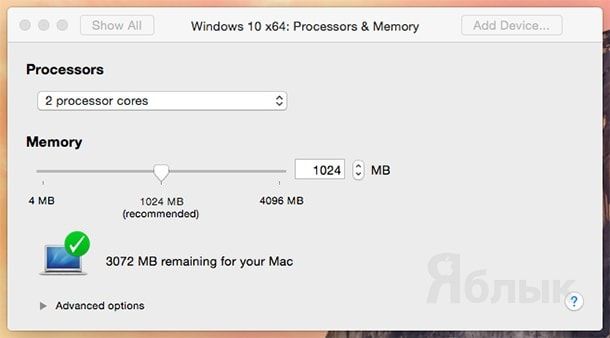
 4. После старта виртуальной машины откройте в разделе «System Settings» пункт «Processors & Memory«. Укажите количество процессоров на вашем Mac и количество оперативной памяти как минимум вдвое меньшее, чем стоит на компьютере.
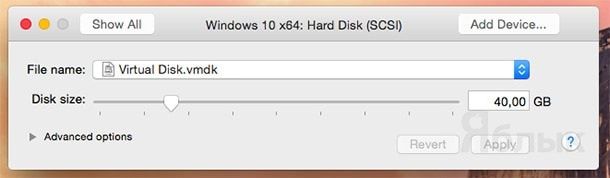
 5. Нажмите «Show All» и выберите раздел «Hard Disk«. Рекомендуемый размер виртуального жёсткого диска — 60 ГБ, но допустимый минимум 40 ГБ (на самом деле вся установленная операционная система с утилитами займёт около 12 ГБ).
 6. Закройте окно настроек нажав на крестик.
 7. Нажмите кнопку воспроизведения для начала установки Windows 10.
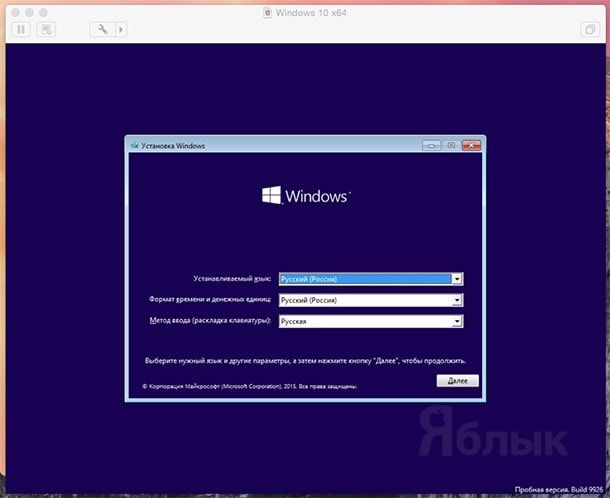
 8. В параметрах выбора языка щёлкните «Далее».
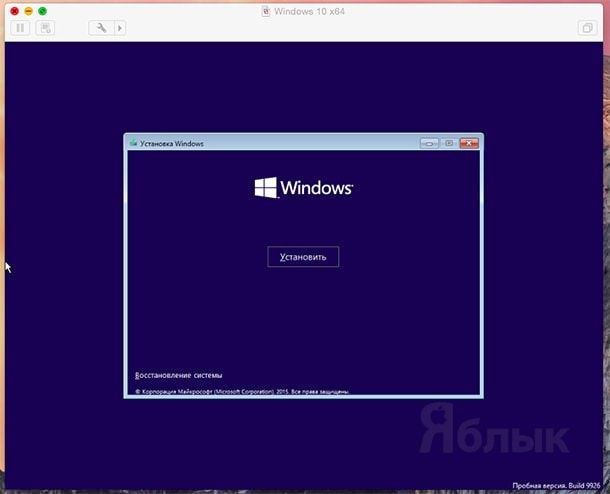
 9. Нажмите «Установить».
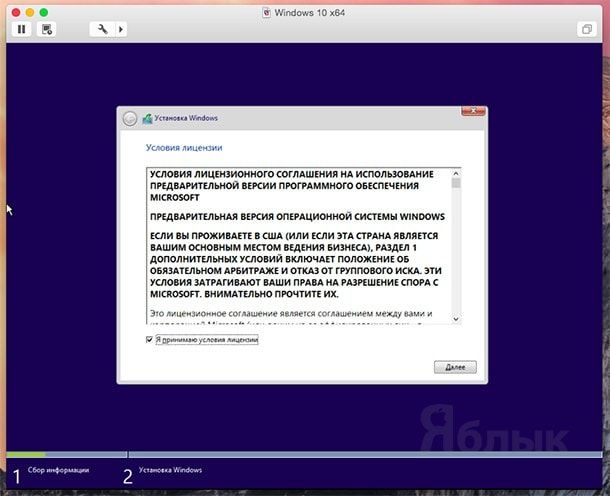
 10. Согласитесь с условиями лицензионного соглашения.
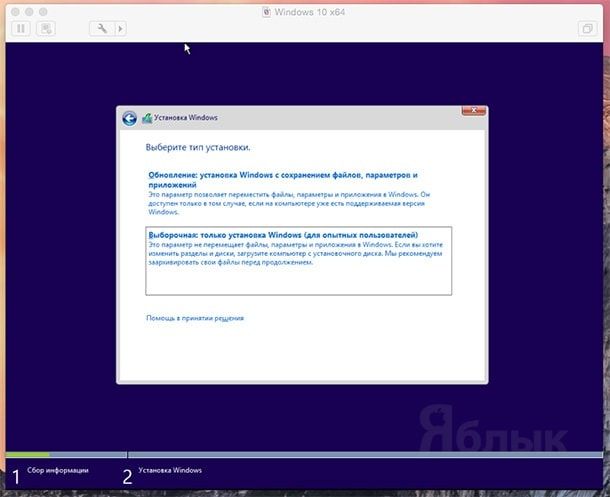
 11. Тип установки —> выборочная.
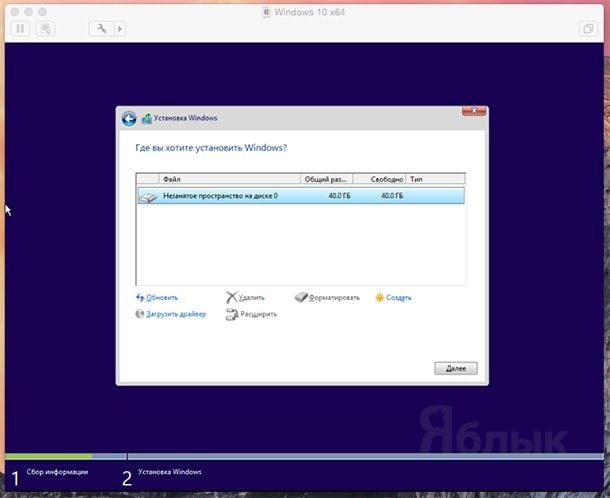
 12. Устанавливаем Windows в незанятое пространство — «Далее».
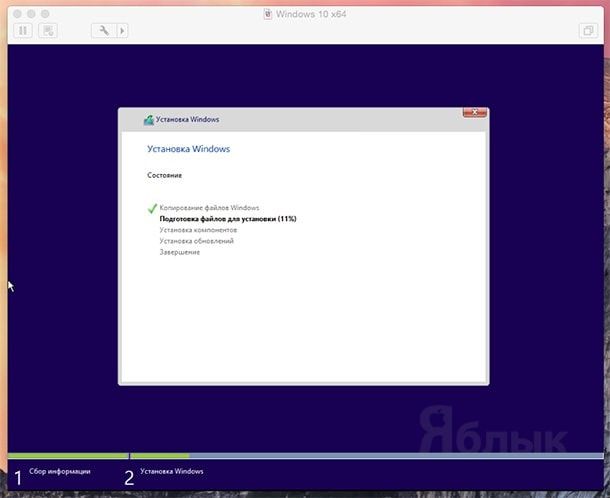
 13. Начнётся процесс установки Windows: копирование файлов, подготовка к инсталляции, установка компонентов и обновлений.
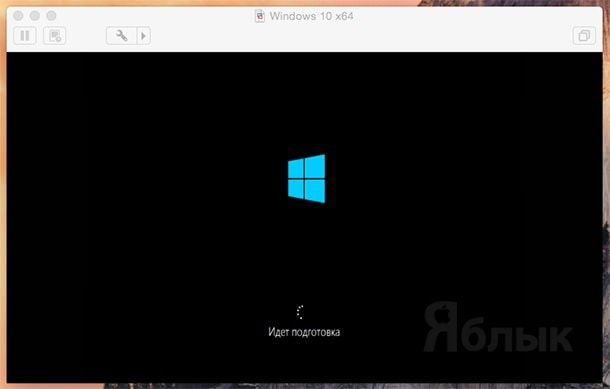
 14. После перезагрузки продолжится установка и подготовка устройств.
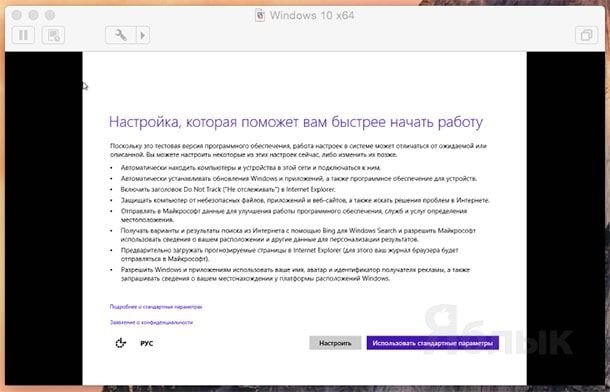
 15. Детальную настройку можно пропустить нажав кнопку «Использовать стандартные параметры».
 16. Введите данные учётной записи и нажмите «Далее».
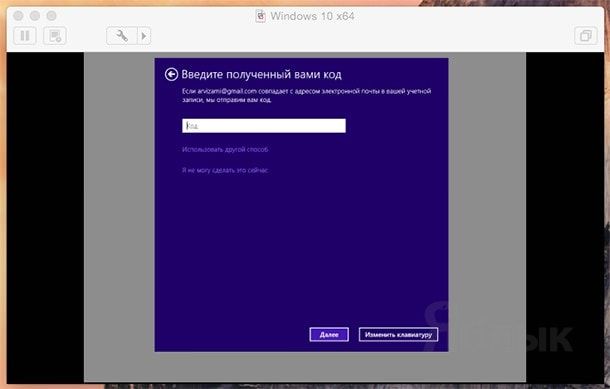
 17. Повторите ввод электронной почты и введите полученный на почтовый ящик код протекции.
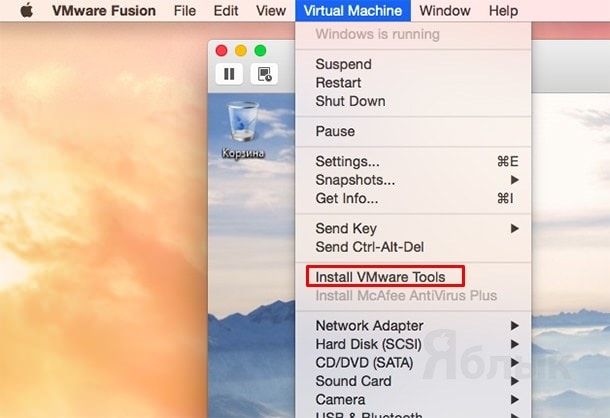
Установка инструментов VMware Tools
Завершающим этапом настройки виртуальной машины под Windows 10 станет установка инструментов VMware Tools. Они содержат все необходимые драйвера и настройки, обеспечивающие максимальную оптимизацию и производительность в зависимости от имеющегося оборудования.
1. Для установки VMware Tools нажмите Virtual Machine —> Install VMware Tools —> Install.
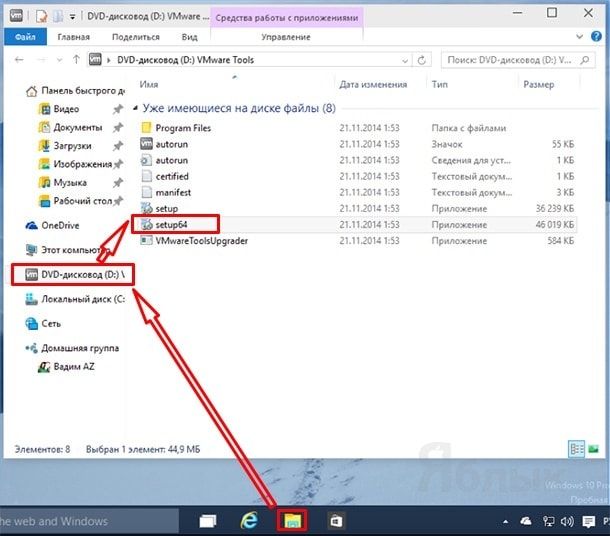
 2. Откройте Проводник Windows —> DVD-дисковод и запустите файл установки «setup64«.
 3. В появившемся окне Контроля учётных записей пользователей разрешите вносить изменения нажатием кнопки «Да».
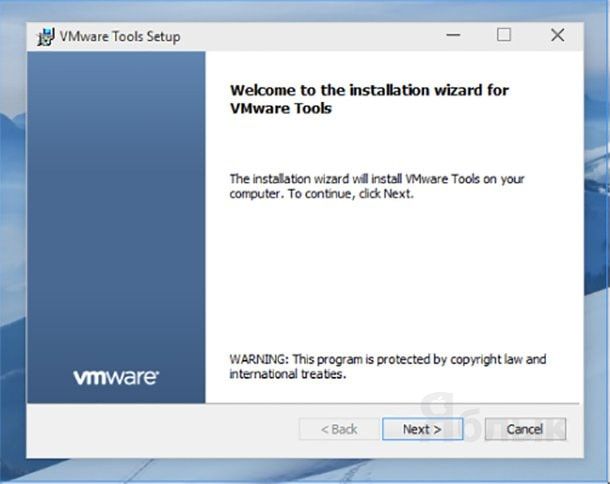
 4. В инсталляторе VMware Tools Setup нажмите «Next«.
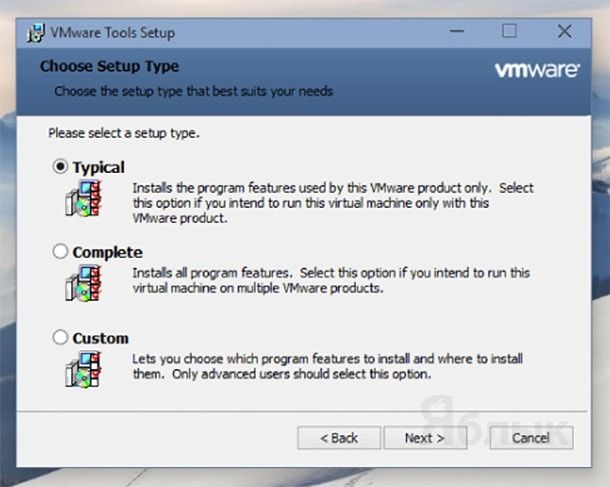
 5. Тип установки «Typical» —> Next.
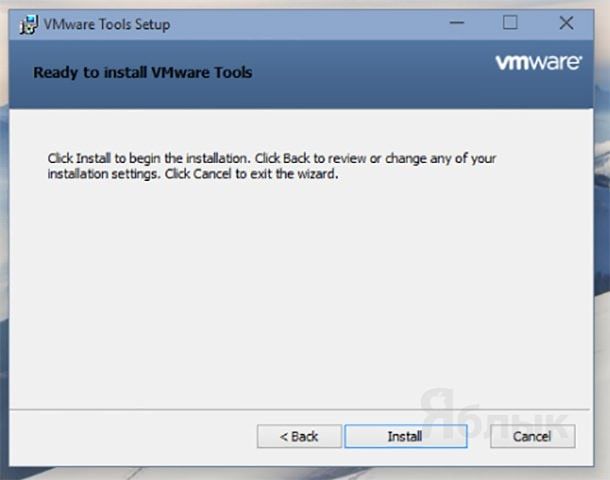
 6. Кликните по «Install«. По окончанию установки — «Finish«.
 7. Перезагрузите компьютер нажатием кнопки «Yes» в появившемся запросе.
 Вся установка длится 15—20 минут. Чиcтая Windows 10 Technical Preview занимает около 12 ГБ свободного места на жёстком диске. Даже на стоковом MacBook Air 13″ система работает довольно шустро.
Install macOS Unlocker on Windows 10 for VMware Workstation 11/12/14/15
1) Since this tool will be changing and updating the binary files on VMware workstation, it is always good practice to backup the VMware program folder before running the unlocker.
2) After downloading the zip file, extract it.
3) If you have the previous version of unlocker, you must uninstall it first. To do that, right-click on the uninstallation script and execute it as administrator.
Note: VMware workstation or player must be completely switched off before running this script.
4) Close any working Vivrutla machines and VMware program. Execute the installation script as administrator.
5) It will patch some files and even download the VMware tools for macOS guest machines. Let it do and complete.
6) Now you must see the difference in the guest OS support. Without the patch, you can’t create any macOS VMs because they were not listed as below.
After the patch, now it should appear as below.
I’m just a tester of this utility. Full credits should go to the developer who produced a great tool. This particular macOS unlocker works on Intel processor Windows and Linux computers only. AMD is not supported yet.
If you are having the older version of VMware workstation, earlier than version 11, then you need the older version of unlocker.
Here is working El Capitan 10.11 on Windows 10 with VMware workstation 15. I will keep publishing guides based on this unlocker.
After patching the VMware workstation with this unlocker then upgrade the VMware to any major versions, the patch is no longer valid. You may not be able to run or create macOS VMs anymore. You need to run the latest unlocker (which has the support of the VMware version you have) to get the macOS virtual machine support again.
Нюансы использования новой системы на виртуальной машине
Установить приложение. Дополнительные приложения в рамках Windows 10 устанавливаются стандартным образом. Так, будто вы используется отдельное устройство на своей операционной системе.
Более того, ОС вообще не понимает, что работает в рамках виртуальной машины. Поэтому можете качать дистрибутивы из интернета прямо с Windows 10 или использовать встроенный магазин приложений.
Обменяться файлами. Для этого достаточно выбрать свою виртуальную машину, перейти в меню ее настроек, а потом добавить необходимую папку с диска Mac в меню общих данных. После перезапуска виртуалки каталог появится в «Моем компьютере».
Подключить флешку. Чтобы подключить накопитель к виртуальной машине, нужно сначала «всунуть» его в компьютер, потом перейти в Finder и воспользоваться кнопкой извлечения.
После этого нужно нажать на значок USB на нижней панели VirtualBox и выбрать устройство, которое необходимо подключить к виртуалке.
Выключить виртуалку. Для этого достаточно просто закрыть окно виртуальной машины. VirtualBox предложит выключить ее, и вам останется только согласиться.
Подготовка виртуальной машины с помощью VMware
Первое, что мы сделаем, это откроем VMware, после применения патча и загрузки всего вышеперечисленного. И как только мы увидим главное окно, мы создадим новую виртуальную машину.
Мы увидим типичного помощника по созданию новой виртуальной машины. Мы должны выбрать, что мы хотим создать машину типа «Custom», чтобы настроить процесс. На следующем шаге мы выберем совместимость с оборудованием VMware 15.x.
Мы продолжим работу с помощником, и настало время выбрать, хотим ли мы монтировать образ для установки операционной системы. На этом этапе мы должны выбрать вариант установки операционной системы позже.
Мы продолжаем с помощником и достигаем точки, где нам придется выбирать тип операционной системы. Благодаря установленному нами патчу появится опция Apple Mac OS X. Мы выберем версию macOS, которую будем использовать. Мы, например, выбираем Macos 10.14 «Мохаве».
На следующем шаге мы должны дать имя нашей виртуальной машине и указать, где мы хотим ее сохранить. Мы должны запомнить маршрут, где будет храниться виртуальная машина, так как позже мы должны будем пойти на нее.
Затем мы должны выбрать количество процессоров и ядер, которые мы хотим, чтобы наша виртуальная машина имела. Пока наше оборудование позволяет, мы должны сконфигурировать 2 процессора и 2 ядра. Мы продолжаем и на следующем шаге мы настроим оперативную память, которую будет иметь виртуальная машина. Хотя должно работать с 4 GB Мы не рекомендуем давать его менее 8 ГБ.
Следующим шагом будет настройка сети. Мы настраиваем его как NAT и продолжаем. Контроллеры ввода / вывода мы оставляем как есть, в LSI Logic. И вид жесткого диска, в SATA.
На следующем шаге мастер спросит нас, хотим ли мы создать новый виртуальный жесткий диск или использовать уже существующий. Если мы собираемся установить macOS в Windows 10 из ISO-образа, мы должны создать новый виртуальный жесткий диск размером не менее 25 ГБ. Однако мы используем загруженный нами VMDK, поэтому мы выберем опцию «использовать существующий виртуальный диск» и выберем каталог, в который мы его скачали (и распаковали). При загрузке жесткого диска мы должны выбрать опцию «Сохранить существующий формат», чтобы не преобразовывать и не изменять ее.
Наконец мы создадим нашу виртуальную машину. Мы можем увидеть сводку ваших опций в последнем окне мастера. Хотя мы еще не закончили.
Отредактируйте конфигурацию VMware, чтобы ввести код macOS
Перед запуском виртуальной машины мы должны вручную внести изменения в файл конфигурации. Без этого изменения попытка загрузки macOS приведет к панической панике, и мы не сможем использовать операционную систему Apple.
Чтобы сделать это, мы должны перейти в папку, в которой мы сохранили виртуальную машину (ту, которую мы указали на первых шагах мастера), и найти файл, завершенный в «.vmx». Мы открываем этот файл с помощью блокнота, чтобы отредактировать его (поскольку это обычный текстовый файл), и добавим следующую строку в конце (как показано в захвате, с одинарными кавычками (shift + 2), не копировать и вставить):
smc.version = «0»
Сохраняем изменения и отправляемся. Теперь у нас есть готовая к работе виртуальная машина MacOS.
macOS Big Sur Virtual Machine Installation Complete
You have two options to choose from for your macOS Big Sur virtual machine. Both options are great if you want to give macOS a try before making the switch from Windows and enjoy some of the best Apple apps on offer.
How to Create a Virtual Machine Using Windows 10 Hyper-V
Did you know Windows 10 has an integrated tool for creating virtual machines? It’s called Hyper-V and here’s how it works.
Read Next
About The Author
Gavin Phillips
(988 Articles Published)
Gavin is the Junior Editor for Windows and Technology Explained, a regular contributor to the Really Useful Podcast, and a regular product reviewer. He has a BA (Hons) Contemporary Writing with Digital Art Practices pillaged from the hills of Devon, as well as over a decade of professional writing experience. He enjoys copious amounts of tea, board games, and football.
More
From Gavin Phillips
What Files Do You Need to Create a macOS Virtual Machine on Windows 10?
Before delving into the «how-to,» you need to download and install the essential tools. The tutorial details how to create macOS virtual machines using both Oracle VirtualBox Manager (VirtualBox) and VMware Workstation Player (VMware Player).
- Download the latest version of VirtualBox. This tutorial uses VirtualBox 6.1.22
- . This tutorial uses VMware Player 16
You need a copy of macOS, too. Big Sur is the latest macOS version. You can find the download links for macOS Big Sur in the next section.
This tutorial will focus on installing macOS Big Sur in a virtual machine running on Intel hardware, using either VirtualBox or VMware Player.
Unfortunately, I do not have access to any AMD hardware, so I cannot provide a tutorial.
There is, however, the code snippet that anyone using an AMD system requires to boot a macOS Big Sur using VMware on AMD hardware.
Launching the macOS Big Sur virtual machine is the same as the Intel version but uses a slightly different code snippet. You can find the tutorial and the code snippet in the section below.
Furthermore, you will find links to several AMD macOS Catalina, Mojave, and High Sierra virtual machine tutorials, at the end of the article.
О VMware Fusion и Parallels Desktop
В данной статье мы сознательно не будем приводить ни сравнение функциональности, ни сравнение производительности продуктов VMware Fusion и Parallels Desktop, чтобы не вызвать горячих споров на эту тему.
В настоящий момент между компаниями SWSoft, владельцем Parallels, и VMware идет ожесточенная конкурентная борьба в сегменте рынка виртуализации для Маков. В свое время Parallels Desktop обрел заслуженную популярность как единственно надежная и многофункциональная платформа, однако у VMware огромный опыт в разработке решений для виртуализации, дающий все основания полагать, что новичок Fusion существенно потеснит Parallels Desktop на рынке виртуализации. Различные информационные порталы (например, CNET), а также независимые блоггеры публикуют множество материалов на тему сравнения возможностей этих двух продуктов, однако сложно сказать, какой из них лучше на данный момент, поскольку их мнения расходятся. Компания Parallels готовит один релиз за другим, пытаясь опередить VMware, которая действительно хорошо сделала продукт Fusion и, в конечном итоге, выбор платформы станет делом вкуса, поскольку обе они справляются с возложенными на них задачами в полном объеме. Однако у VMware Fusion есть один бесспорный плюс – совместимость с другими платформами VMware и большие технические и маркетинговые ресурсы. Это позволит ей получить немалую долю рынка компании Parallels, которая, впрочем, успела заработать немало денег на продажах суперпопулярного Parallels Desktop. В ближайшее время ожидается борьба этих двух компаний за виртуализацию серверов на платформе XServe (компания Parallels уже анонсировала свой продукт Parallels Server).
Так или иначе, мы рекомендуем попробовать оба продукта и выбрать наиболее подходящее решение, тем более что они продаются по одинаковой цене – 79.99$ за копию (при заказе нескольких копий обе компании предоставляют скидки). Для тех, кто уже использует виртуальные машины на платформе Parallels Desktop, далее приведена инструкция по их миграции на платформу VMware Fusion.