How to install rsat in windows 10 (3 methods)
Содержание:
- Установка RSAT в Windows 10 с помощью PowerShell
- Второй способ
- Сохранение реестра перед изменениями
- Установка на windows server
- Marketing
- Changes to this Privacy Notice
- Где скачать и как установить
- How to Install Active Directory Users and Computers (dsa.msc) on Windows 10?
- Вот как исправить сбои RSAT
- Options to Install Active Directory in Windows 10
- How can I install RSAT on Windows 11?
- Профессиональные советы
- Collection and Use of Information
- What are Windows 10 admin tools?
Установка RSAT в Windows 10 с помощью PowerShell
Вы можете установить компоненты администрирования RSAT с помощью PowerShell. В этом примере мы покажем, как управлять компонентами RSAT в Windows 10 20H2.
С помощью следующей PowerShell команды можно вывести список компонентов RSAT, установленных на вашем компьютере:
Можно представить статус установленных компонентов RSAT в более удобной таблице:
Get-WindowsCapability -Name RSAT* -Online | Select-Object -Property DisplayName, State
В нашем примере инструменты управления DHCP и DNS установлены (Installed), а все остальные модуль RSAT отсутствуют (NotPresent).
Для установки RSAT в Windows используется PowerShell командлет Add-WindowsCapability.
Чтобы установить конкретный инструмент RSAT, например инструменты управления AD (в том числе консоль ADUC из модуль Active Directory для Windows Powershell), выполните команду:
Add-WindowsCapability –online –Name Rsat.ActiveDirectory.DS-LDS.Tools~~~~0.0.1.0
Для установки консоли управления DNS и модуля PowerShell DNSServer, выполните:
Add-WindowsCapability –online –Name Rsat.Dns.Tools~~~~0.0.1.0
И т.д.
Add-WindowsCapability -Online -Name Rsat.BitLocker.Recovery.Tools~~~~0.0.1.0 Add-WindowsCapability -Online -Name Rsat.CertificateServices.Tools~~~~0.0.1.0 Add-WindowsCapability -Online -Name Rsat.DHCP.Tools~~~~0.0.1.0 Add-WindowsCapability -Online -Name Rsat.FailoverCluster.Management.Tools~~~~0.0.1.0 Add-WindowsCapability -Online -Name Rsat.FileServices.Tools~~~~0.0.1.0 Add-WindowsCapability -Online -Name Rsat.GroupPolicy.Management.Tools~~~~0.0.1.0 Add-WindowsCapability -Online -Name Rsat.IPAM.Client.Tools~~~~0.0.1.0 Add-WindowsCapability -Online -Name Rsat.LLDP.Tools~~~~0.0.1.0 Add-WindowsCapability -Online -Name Rsat.NetworkController.Tools~~~~0.0.1.0 Add-WindowsCapability -Online -Name Rsat.NetworkLoadBalancing.Tools~~~~0.0.1.0 Add-WindowsCapability -Online -Name Rsat.RemoteAccess.Management.Tools~~~~0.0.1.0 Add-WindowsCapability -Online -Name Rsat.RemoteDesktop.Services.Tools~~~~0.0.1.0 Add-WindowsCapability -Online -Name Rsat.ServerManager.Tools~~~~0.0.1.0 Add-WindowsCapability -Online -Name Rsat.Shielded.VM.Tools~~~~0.0.1.0 Add-WindowsCapability -Online -Name Rsat.StorageMigrationService.Management.Tools~~~~0.0.1.0 Add-WindowsCapability -Online -Name Rsat.StorageReplica.Tools~~~~0.0.1.0 Add-WindowsCapability -Online -Name Rsat.SystemInsights.Management.Tools~~~~0.0.1.0 Add-WindowsCapability -Online -Name Rsat.VolumeActivation.Tools~~~~0.0.1.0 Add-WindowsCapability -Online -Name Rsat.WSUS.Tools~~~~0.0.1.0
Чтобы установить сразу все доступные инструменты RSAT, выполните:
Get-WindowsCapability -Name RSAT* -Online | Add-WindowsCapability –Online
Также вы можете установить компоненты RSAT с помощью утилиты управления образом DISM. Например: DISM.exe /Online /add-capability /CapabilityName:Rsat.ActiveDirectory.DS-LDS.Tools~~~~0.0.1.0 /CapabilityName:Rsat.GroupPolicy.Management.Tools~~~~0.0.1.0 /CapabilityName:Rsat.WSUS.Tools~~~~0.0.1.0
Чтобы установить только отсутствующие компоненты RSAT, выполните:
Get-WindowsCapability -Name RSAT* -Online | where State -EQ NotPresent | Add-WindowsCapability –Online
Теперь убедитесь, что инструменты RSAT установлены (статус Installed);
После этого установленные инструменты RSAT отобразятся в панели Manage Optional Features.
Второй способ
Проверьте, активирована ли служба «Установщик модулей Windows». Для этого необходимо:
- Через встроенный поиск ввести «службы», открыть программу.
Через встроенный поиск открываем «Службы», введя в поле соответствующее слово
- Найти службу «Установщик модулей Windows», раскрыть двойным левым щелчком мышки.
Находим службу «Установщик модулей Windows», раскрываем двойным левым щелчком мышки
- Кликнуть по опции «Запустить», в разделе «Тип запуска» выбрать «Вручную» или «Автоматически».
Кликаем по опции «Запустить», в разделе «Тип запуска» выбираем «Вручную» или «Автоматически»
Сохранение реестра перед изменениями
Нужно сделать следующее:
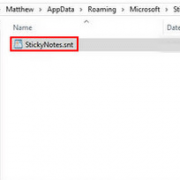
- Необходимо в основном меню «Пуск» выбрать пункт «Выполнить», ввести команду regedit и нажать ЛКМ кнопку «ОК». Откроется окно редактора реестра, где нужно будет пройти по пути HKEY_LOCAL_MACHINE/SYSTEM/CurrentControlSet/services.
Переход к папке services в ветке HKEY_LOCAL_MACHINE
- Папку services следует экспортировать, для чего в верхнем меня выбрать «Файл» — «Экспорт».
Экспорт папки services
- В открывшемся окне следует ввести любое имя файла реестра с последующим сохранением.
Сохранение данных экспортируемой папки реестра в файл
- Готово. Файл сохранён.
Установка на windows server
На удалённых серверах должно быть включено удалённое управление Windows PowerShell и диспетчером сервера, чтобы ими можно было управлять с помощью средств удалённого администрирования сервера для Windows 10. Удалённое управление включено по умолчанию на серверах, работающих под управлением Windows Server 2021, Windows Server 2021, Windows Server 2021 R2 и Windows Server 2021.
Чтобы разрешить удалённое управление компьютером с помощью диспетчера сервера или Windows PowerShell, установите флажок «Включить удалённый доступ к этому серверу с других компьютеров». На панели задач Windows щёлкните «Диспетчер серверов», на начальном экране — «Диспетчер сервера», в области «Свойства» на странице «Локальные серверы» нужно щёлкнуть значение гиперссылки для свойства «Удалённое управление», и там будет нужный флажок.
Другой вариант, как включить удалённое управление на компьютере с Windows Server, это следующая команда:
Просмотреть текущий параметр удалённого управления:
Хотя командлеты Windows PowerShell и средства администрирования командной строки не перечислены в консоли диспетчера сервера, они также установлены в составе средств удалённого администрирования. Например, открываем сеанс Windows PowerShell и запускаем командлет:
И видим список командлетов служб удалённых рабочих столов. Они теперь доступны для запуска на локальном компьютере.
Управлять удалёнными серверами можно также из-под Windows Server. Согласно проведённым тестам, в Windows Server 2021 и более поздних выпусках Windows Server диспетчер серверов можно использовать для управления до 100 серверами, настроенными на выполнение обычной рабочей нагрузки.
Число серверов, которыми можно управлять, используя единую консоль диспетчера серверов, зависит от количества данных, запрашиваемых от управляемых серверов, а также от аппаратных и сетевых ресурсов, доступных на компьютере, на котором выполняется диспетчер серверов.
Диспетчер серверов нельзя использовать для управления более новыми выпусками операционной системы Windows Server. Например, диспетчер серверов под управлением Windows Server 2021 R2, Windows Server 2021, Windows 8.1 или Windows 8 нельзя использовать для управления серверами под управлением Windows Server 2021.
Диспетчер серверов позволяет добавлять серверы для управления в диалоговом окне «Добавление серверов» тремя способами.
При добавлении удалённых серверов в диспетчер серверов некоторые из них могут требовать учётные данные другой учётной записи пользователя для доступа или управления ими. Чтобы указать учётные данные, отличные от используемых для входа на компьютер, на котором работает диспетчер серверов, воспользуйтесь командой
Manage As
после добавления сервера в диспетчер. Она вызывается правой кнопкой по записи для управляемого сервера в плитке
«Серверы»
домашней страницы роли или группы. Если щёлкнуть команду Manage As, откроется диалоговое окно
«Безопасность Windows»
, в котором можно ввести имя пользователя, имеющего права доступа на управляемом сервере, в одном из следующих форматов.
Marketing
Pearson may send or direct marketing communications to users, provided that
- Pearson will not use personal information collected or processed as a K-12 school service provider for the purpose of directed or targeted advertising.
- Such marketing is consistent with applicable law and Pearson’s legal obligations.
- Pearson will not knowingly direct or send marketing communications to an individual who has expressed a preference not to receive marketing.
- Where required by applicable law, express or implied consent to marketing exists and has not been withdrawn.
Pearson may provide personal information to a third party service provider on a restricted basis to provide marketing solely on behalf of Pearson or an affiliate or customer for whom Pearson is a service provider. Marketing preferences may be changed at any time.
Changes to this Privacy Notice
We may revise this Privacy Notice through an updated posting. We will identify the effective date of the revision in the posting. Often, updates are made to provide greater clarity or to comply with changes in regulatory requirements. If the updates involve material changes to the collection, protection, use or disclosure of Personal Information, Pearson will provide notice of the change through a conspicuous notice on this site or other appropriate way. Continued use of the site after the effective date of a posted revision evidences acceptance. Please contact us if you have questions or concerns about the Privacy Notice or any objection to any revisions.
Last Update: November 17, 2020
Где скачать и как установить
Вначале нужно выполнить установку RSAT на свой ПК. По умолчанию этот инструмент в Win 10 отсутствует. С помощью RSAT удастся дистанционно управлять объектами сети с использованием Диспетчера серверов. Этот сервис нельзя загрузить на ноутбук, работающий на основе Домашней или Стандартной версии. RSAT разрешается скачивать на мощные ПК, имеющие Профессиональную или Корпоративную редакцию Win 10.
Как самостоятельно скачать RSAT:
зайти на сайт «Майкрософт»;
- найти «Remote Server Administration Tools» (для конкретной редакции Win 10);
- выбрать пакет, соответствующий конкретной разрядности (х64 или х86);
- нажать на Download;
- добавить RSAT на свой ПК;
- в ходе установки активировать инсталляцию сопутствующих обновлений;
- в конце перезапустить ПК.
Завершив скачивание RSAT, рекомендуется выполнить активацию этого средства на своем ПК:
- вызвать Control Panel;
- отыскать подпункт «Programs and Features»;
кликнуть по «Turn Windows features on or off»;
- появится окошко «Win Feature»;
- отыскать «Remote Server Administration Tools»;
- раскрыть ветку;
- найти «Role Administration Tools»;
- пометить птичкой «AD DS and AD LDS Tools» и другие строчки в этой ветке (должны быть активными по умолчанию);
- выделить «AD DS Tools» и нажать на «ОК».
Установку ADUC удастся выполнить из «Командной строчки с помощью таких команд:
- «Dism / online / enable-feature / featurename:RSAT Client-Roles-AD»;
- «Dism / online / enable-feature / featurename:RSAT Client-Roles-AD-DS»;
- «Dism / online / enable-feature / featurename:RSAT Client-Roles-AD-DS-SnapIns».
Важно! После скачивания инструментов нужно вызвать Панель управления и зайти в подпункт «Administrative Tools». Там должна появиться новая опция под названием «Active Directory Users and Computers»
После появления этого инструмента разрешается подсоединиться к контроллеру. Выполнить это действие пользователь сможет самостоятельно.
How to Install Active Directory Users and Computers (dsa.msc) on Windows 10?
By default, RSAT is not installed in Windows 10 (and other Windows desktop operating systems). Remote Server Administration Tools (RSAT) allows IT administrators to remotely manage roles and components on Windows Server 2019, 2016, 2012 R2, 2012, 2008 R2 from user’s workstations running Windows 10, 8.1, 8, and Windows 7. The RSAT resembles Windows Server 2003 Administration Tools Pack (adminpak.msi) that was installed on clients running Windows 2003 or Windows XP and was used for remote server management. RSAT can’t be installed on computers with the Home editions of Windows, you must have Professional or Enterprise.
Depending on Windows 10 build, the ADUC console installation differs.
Installing ADUC in Windows 10 1809 and Newer
In Windows 10 1809 and newer builds, the RSAT pack is added to the Features on Demand (FoD). In order to install ADUC, you can add an optional feature from FoD.
- Press the Start menu > Settings > Apps;
- Select Manage Optional Features > Add features;
- In the list of optional features already installed on your Windows 10 desktop, select RSAT: Active Directory Domain Services and Lightweight Directory Tools, and press Install.
After the RSAT installation completes, you need to restart your computer.
Install ADUC Using Command Prompt
Also, you can install the Active Directory console using the DISM tool. To verify that the RSAT ActiveDirectory component is installed, open a command prompt as an administrator, and run the command:
DISM.exe /Online /Get-CapabilityInfo /CapabilityName:Rsat.ActiveDirectory.DS-LDS.Tools~~~~0.0.1.0
The screenshot above shows the RSAT Active Directory feature is not installed. To install, you need to run the command:
DISM /Online /Add-Capability /CapabilityName:Rsat.ActiveDirectory.DS-LDS.Tools~~~~0.0.1.0
Now check the status of AD RSAT. It should be changed to State: Installed.
RSAT components are downloaded over the Internet from Windows Update servers. If you want to install RSAT in a disconnected environment (without Internet access), you need to download the Feature on Demand (FoD) ISO image for your Windows 10 release. FoD DVD media is available for download from your Volume License Servicing Center (VLSC) or on my.visualstudio.com.
To install ADUC offline, you need to mount the FoD iso image to a virtual drive (for example, to drive F:\) and run the installation from local media:
Dism.exe /online /add-capability /source:F: /Rsat.ActiveDirectory.DS-LDS.Tools~~~~0.0.1.0
How to Enable Active Directory Tools in Windows 10?
It remains to activate the necessary RSAT function. To do this:
- Right-click on the Start button and select Control Panel;
- Select Programs and Features;
- In the left pane press on Turn Windows features on or off;
- Expand node Remote Server Administration Tools > Role Administration Tools > AD DS and AD LDS Tools;
- Check item AD DS Tools and press OK.
However, you can install the AD feature from the command prompt with administrator privileges using the following commands:
dism /online /enable-feature /featurename:RSATClient-Roles-AD

dism /online /enable-feature /featurename:RSATClient-Roles-AD-DS

dism /online /enable-feature /featurename:RSATClient-Roles-AD-DS-SnapIns
Вот как исправить сбои RSAT
1. Убедитесь, что клиент-сервер совместим
Во-первых, пользователи должны учитывать, что инструменты RSAT не работают при всех обновлениях (специфика операционной системы), поскольку существуют разные версии для разных обновлений операционной системы.
Для правильной работы компонентов RSAT в Windows 10 требуется обновление операционной системы Windows Server. Компьютер с операционной системой Windows 10, скорее всего, будет поддерживать самую последнюю версию программного обеспечения RSAT.
В большинстве случаев системный администратор может обнаружить, что установлена последняя версия средств удаленного администрирования сервера, несовместимая со сборкой Windows 10. Если это так, и всякий раз, когда запуск RSAT приводит к сбою, вам, возможно, придется выполнить следующий шаг.
Удалите предыдущую версию rsat и установите совместимую версию
rsat Отображение установленных обновлений
В некоторых случаях полное удаление предыдущей версии и установка новой совместимой версии решает проблемы сбоев.
Следует отметить, что пакет RSAT доступен на клиентских компьютерах Windows 10 build 1607 (SKU для учебных заведений, Professional и Enterprise) и некоторых других сборках.
Пользователи могут узнать, какая сборка Windows 10 имеет поддерживаемую версию пакета RSAT.
Чтобы удалить существующую версию программного обеспечения RSAT, установленную на вашем компьютере, выполните следующие действия:
- Нажмите WinKey + R , чтобы открыть диалоговое окно «Выполнить» , затем введите « панель управления » и нажмите ОК .
- Нажмите Удалить программу в меню Программы .
- Нажмите на Просмотр установленных обновлений
- Нажмите «Обновление для Microsoft Windows (KB2693643)» один раз и выберите «Удалить программу», чтобы удалить программное обеспечение и его функции.
- Нажмите Да , чтобы подтвердить действие, и существующая версия RSAT на компьютере с Windows 10 должна быть полностью удалена.
2.Как загрузить последнее обновление RSAT
Чтобы загрузить и установить новейшие средства удаленного администрирования сервера, доступные для вашего компьютера с Windows 10, нажмите здесь и следуйте этим инструкциям:
- Выберите установщик, который соответствует вашей предпочтительной архитектуре, отметив либо 32-разрядный (x86), либо 64-разрядный флажок.
- Нажмите Далее , чтобы подтвердить выбор и начать загрузку.
- Дважды щелкните полностью загруженный файл установщика, чтобы начать установку
- Установите флажок лицензионного соглашения и нажмите Далее , чтобы завершить установку пакета.
Рекомендуется: Microsoft меняет журнал обновления Windows 10 с текстового файла на двоичный файл
3. Советы по выбору языка для обновления RSAT
Примечание . Перед запуском файла установщика RSAT необходимо установить английский язык США в качестве языка и установить его в качестве основного языка на компьютере с Windows 10.
Если язык не установлен, процесс установки определенно завершится неудачей. После завершения установки инструментов удаленного администрирования сервера языковые настройки можно изменить на прежние.
В предыдущих версиях Windows инструменты администрирования, включенные в пакет RSAT, были включены вручную, но в Win 10 эти инструменты легко включаются после установки.
Чтобы подтвердить состояние инструментов администрирования, выполните следующие действия:
-
Нажмите WinKey + R , чтобы открыть диалоговое окно Windows Выполнить , затем введите « панель управления » и нажмите ОК чтобы подтвердить.
- Нажмите Удалить программу в меню Программы .
- Нажмите на Просмотр установленных обновлений
- Нажмите Включить или выключить функции Windows
Инструменты RSAT должны быть проверены автоматически. Если нет, отметьте все три набора инструментов администрирования и нажмите ОК , чтобы сохранить сделанный выбор.
После полной деинсталляции предыдущей версии пакета средств удаленного администрирования сервера и установки новой версии для Windows 10 будет возможно обеспечить бесперебойную работу при использовании программного обеспечения RSAT.
Options to Install Active Directory in Windows 10
The 3 options discussed in this guide are (Install RSAT for AD):
- From Manage optional features
- Using DISM
- With PowerShell
Install RSAT for Active Directory in Windows 10 with Manage Optional Features
To enable Active Directory with this method:
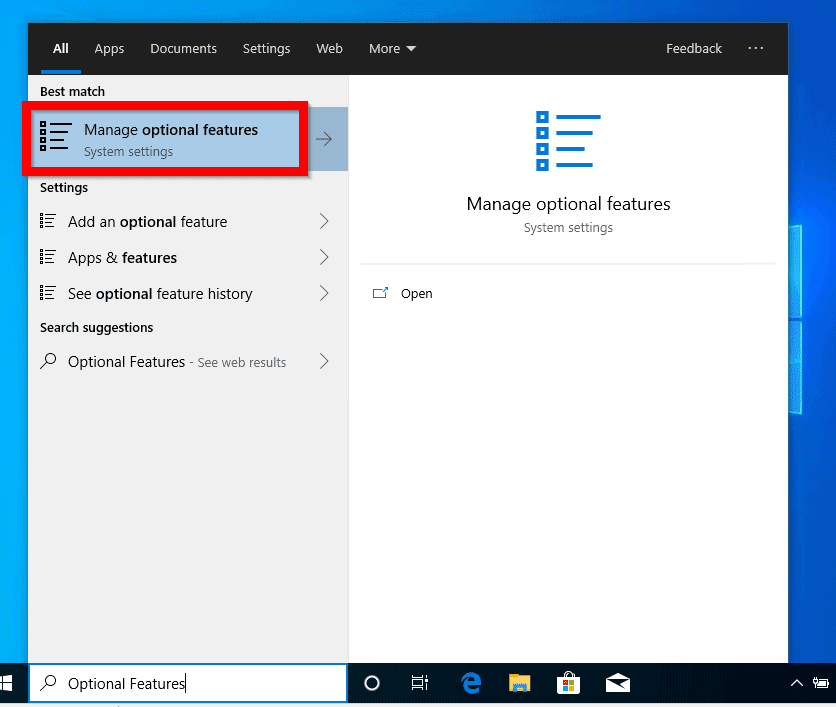
Type Optional Features in the search bar. Then select Manage Optional Features.
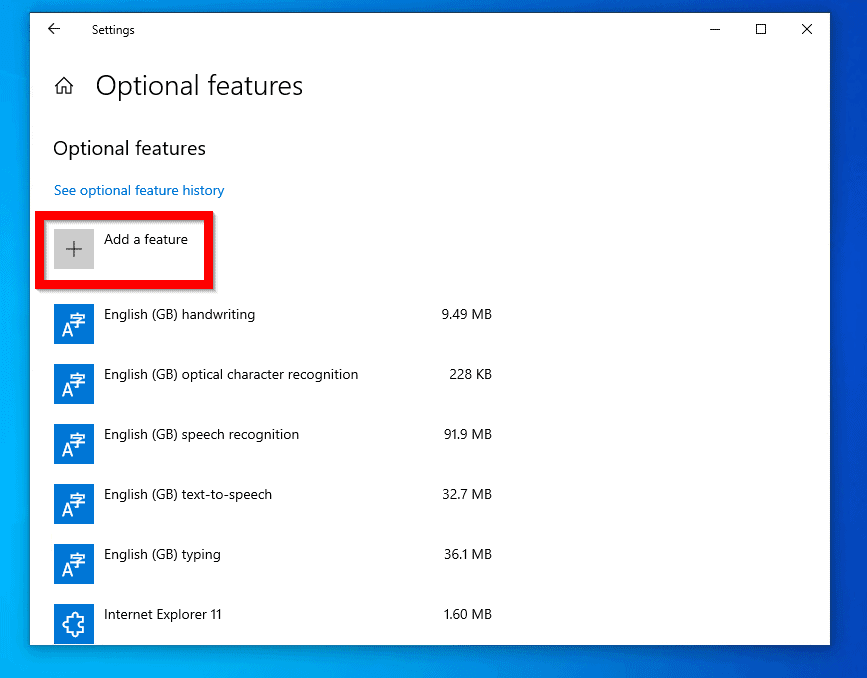
Then click Add features.
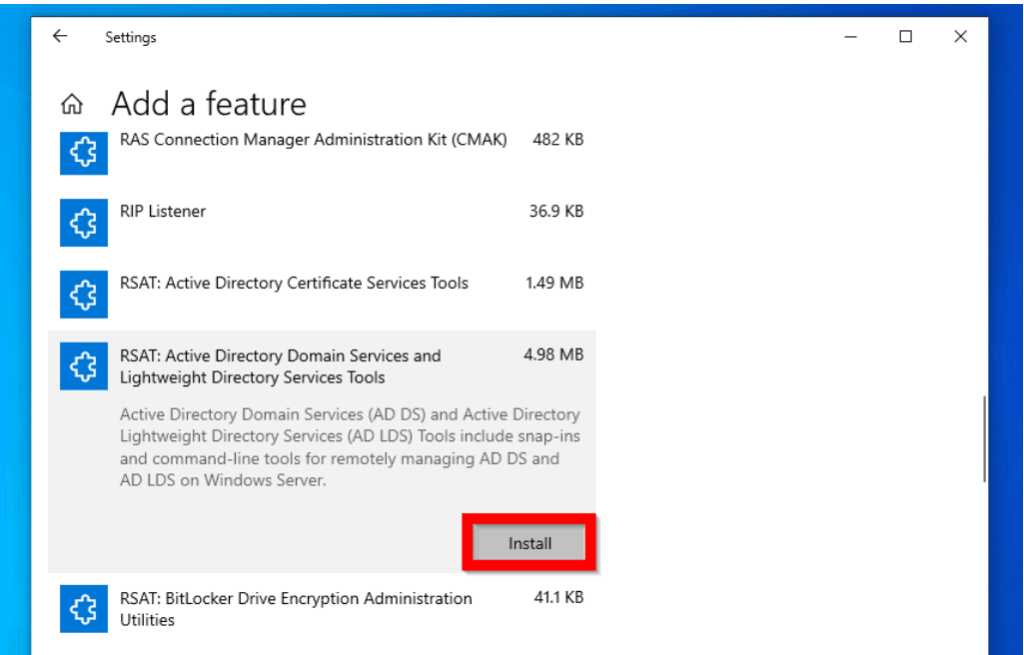
Scroll to RSAT: Active Directory Domain Services and Lighweight Directory Services Tools. Then click it.
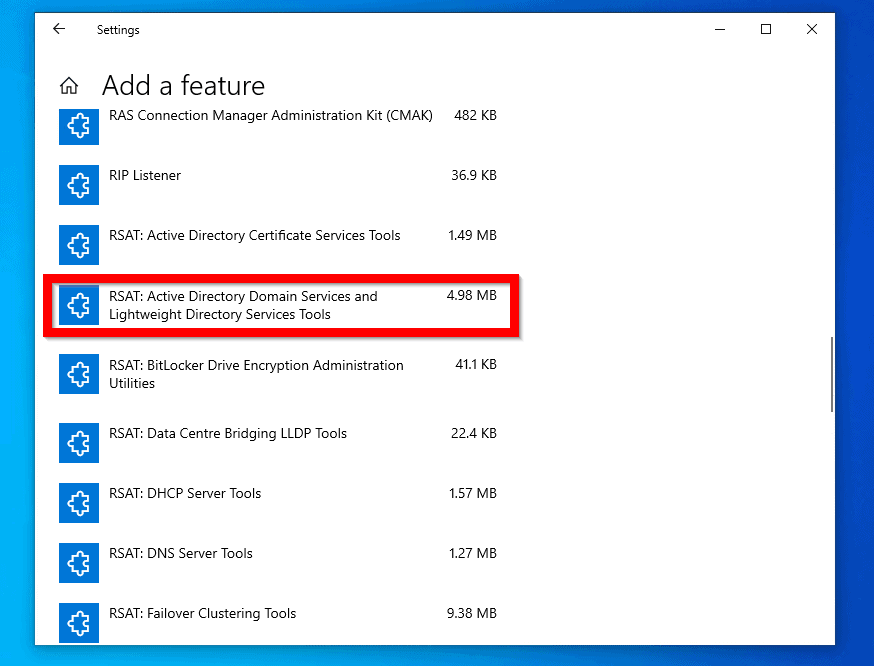
Click Install.

To confirm that the feature is installed, click the back button beside Settings.
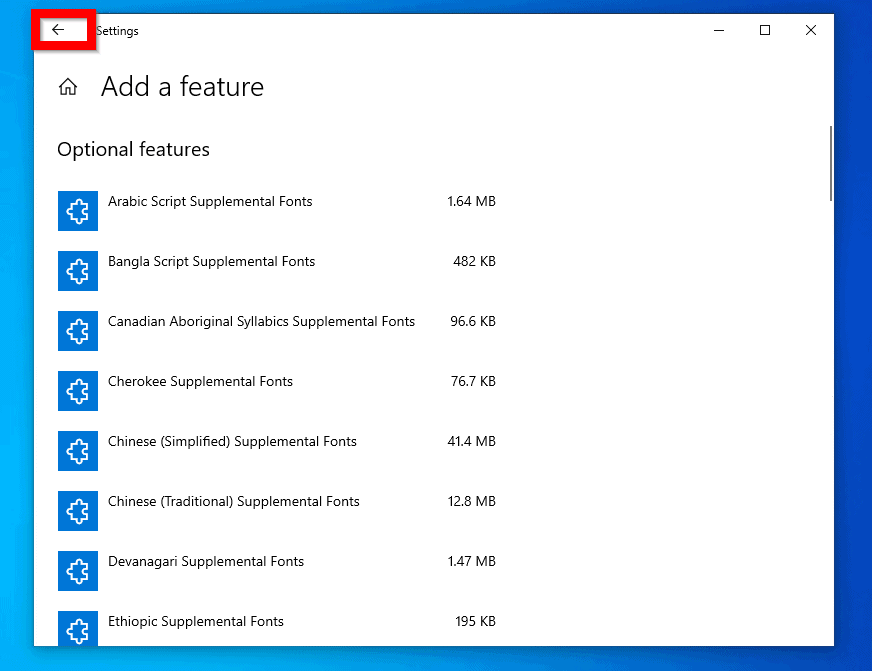
Then click see optional feature history. The feature installation progress bar will be displayed.
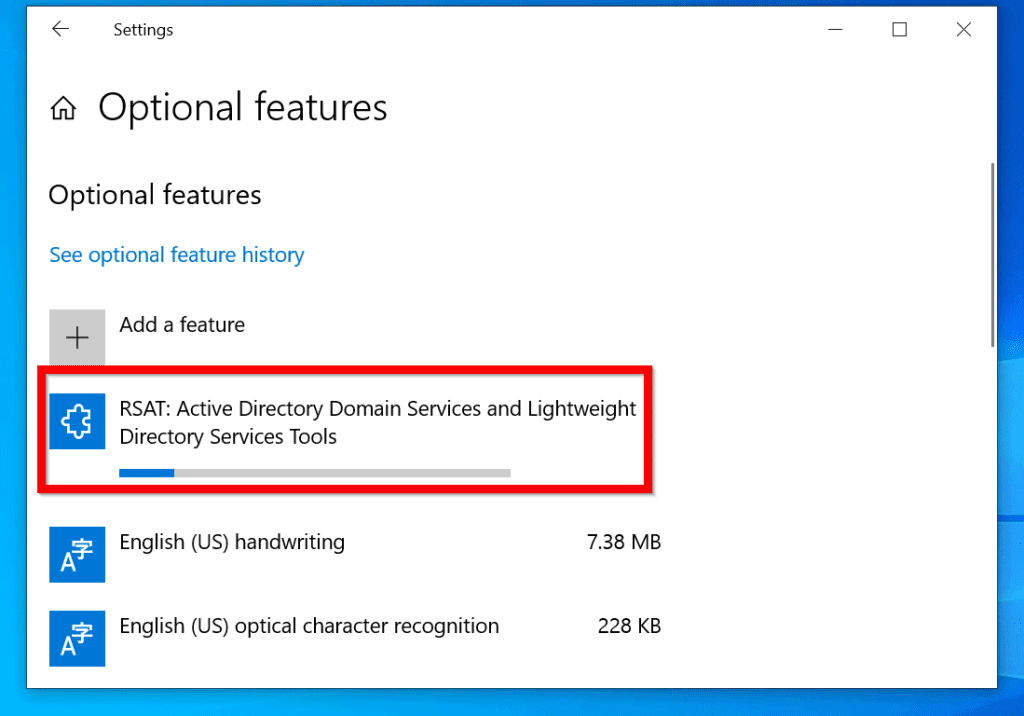
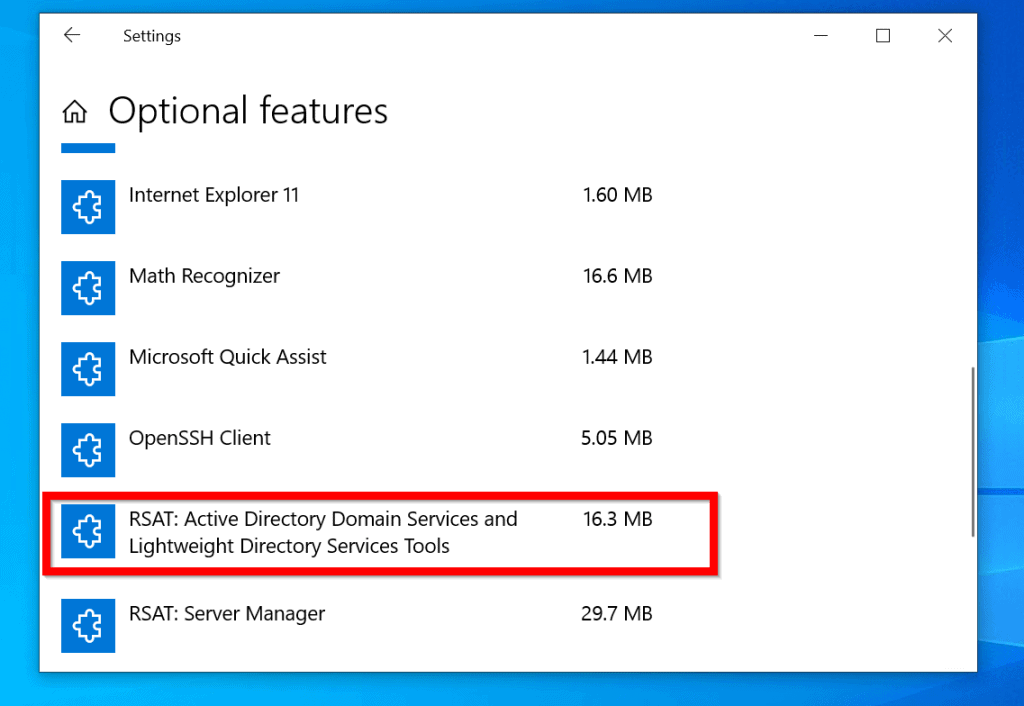
When the installation is completed, scroll down the Optional features list. RSAT: Active Directory Domain Services and Lighweight Directory Services Tools will be listed.
To confirm that this feature is installed, search for Active Directory. You should find all the AD tools.

Install RSAT for Active Directory in Windows 10 with DISM

Another method to install Active Directory is to use DISM Command.
Here are the steps:
Type cmd in search bar. Then right-click Command Prompt and select Run as administrator.
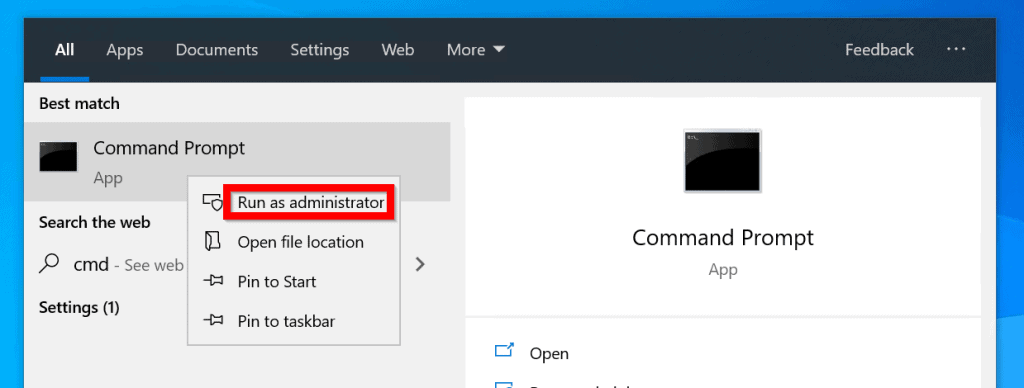
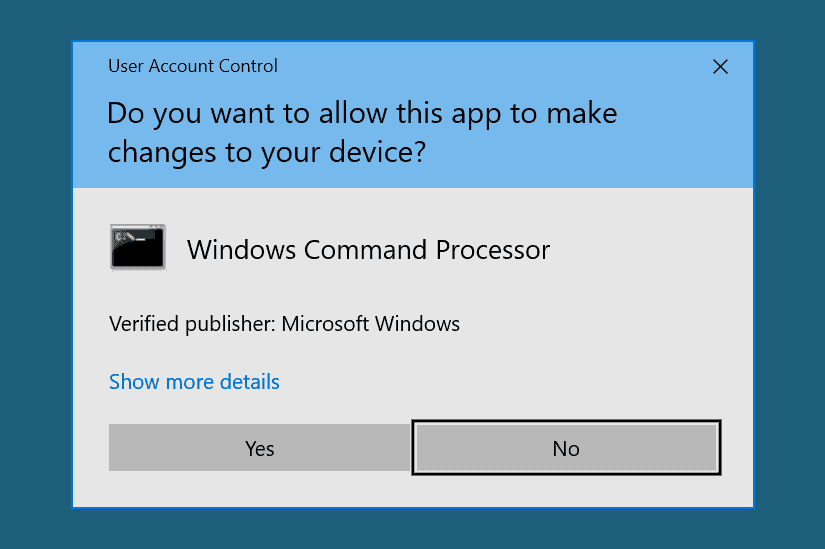
Then at User Account Control prompt, click Yes.
Finally, at command prompt, type this command. Then press enter.
DISM.exe /Online /Get-Capabilities | find "Rsat.Active"
The command will display the feature name for RSAT for Active Directory….

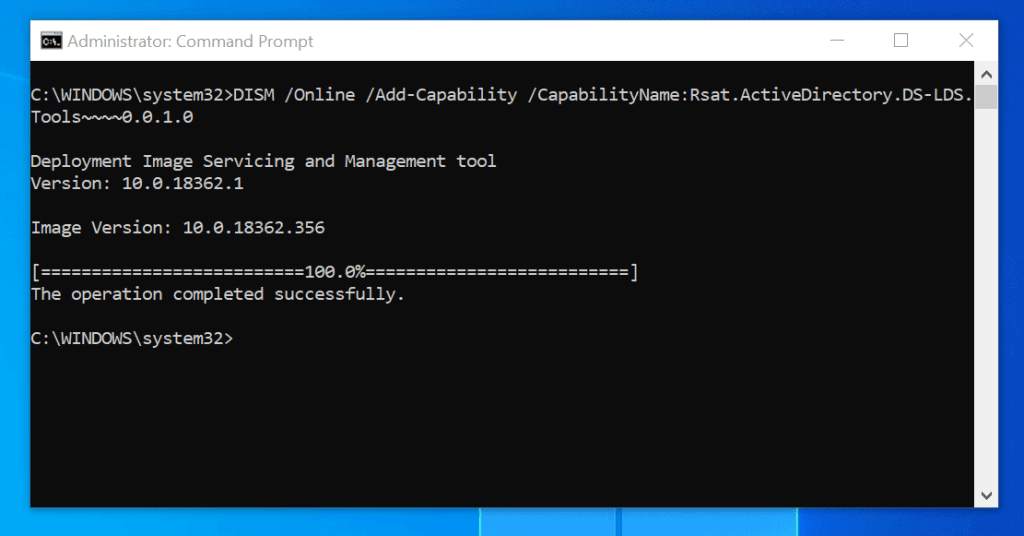
To install Active Directory RSAT tools, type this command. Then press enter.
DISM /Online /Add-Capability /CapabilityName:Rsat.ActiveDirectory.DS-LDS.Tools~~~~0.0.1.0
Ensure to copy the capability name from the /Get-Capabilities command. When you press enter the feature installation will begin…
If the installation appear to be hanging, wait. It will eventually progress to 100%
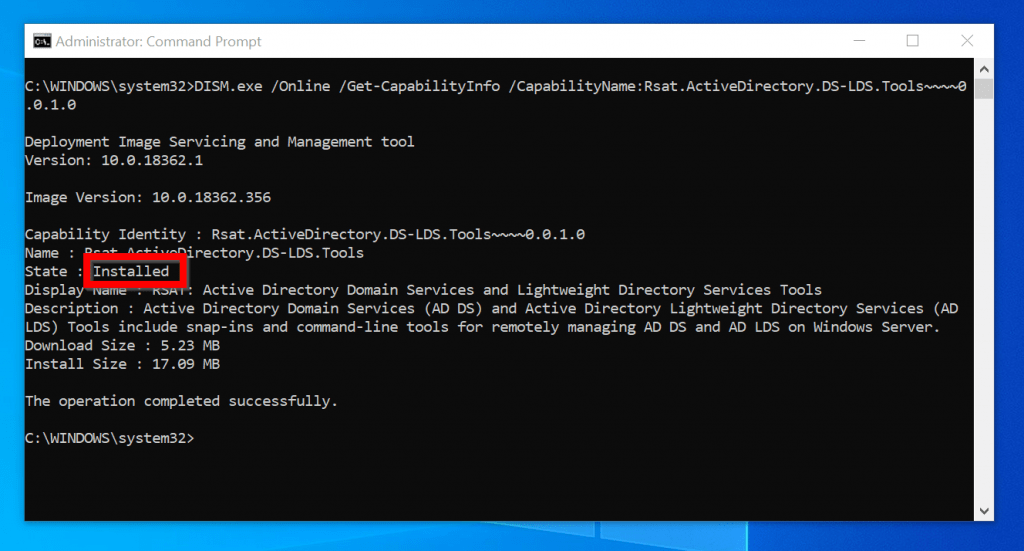
When the installation is completed, you can confirm the installation with the command below:
DISM.exe /Online /Get-CapabilityInfo /CapabilityName:Rsat.ActiveDirectory.DS-LDS.Tools~~~~0.0.1.0
Here is the result of the command. The State is displayed as Installed.
Install RSAT for Active Directory in Windows 10 with PowerShell
You can also enable RSAT for Active Directory in Windows 10 with PowerShell.
Here are the steps:
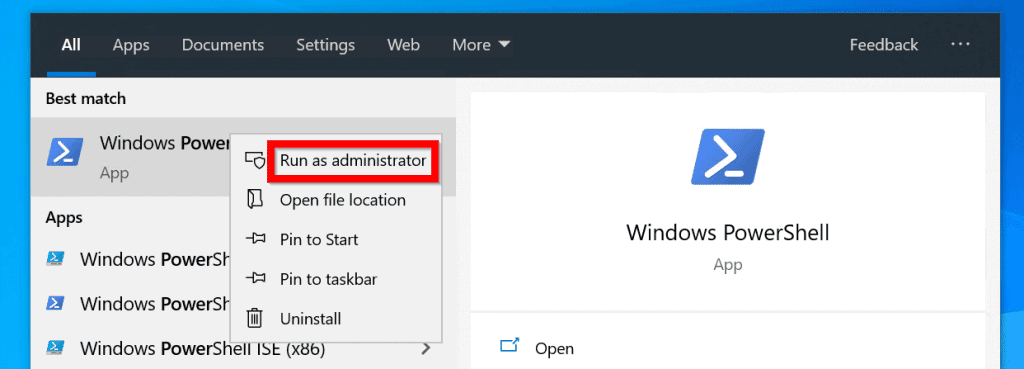
Search PowerShell. Then right-click Windows PowerShell and select Run as Administrator.
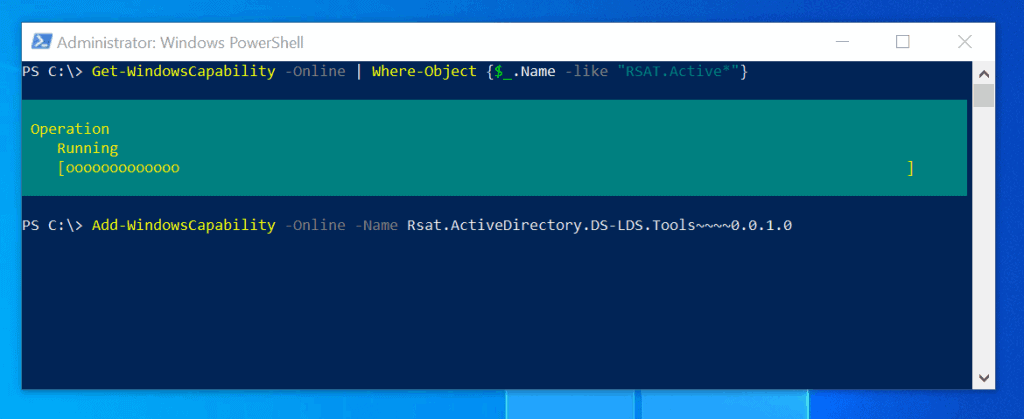
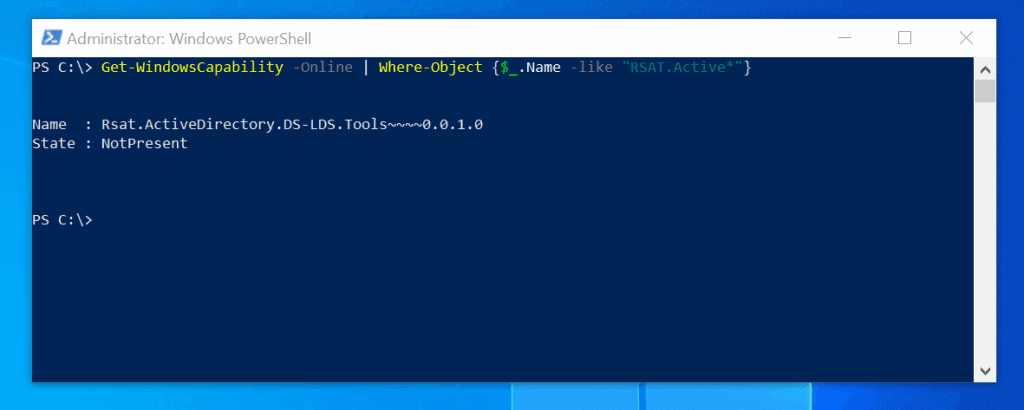
At powershell command prompt, type the command below. Then press enter.
Get-WindowsCapability -Online | Where-Object {$_.Name -like "RSAT.Active*"}
The command will display the feature name of RSAT for Active Directory.
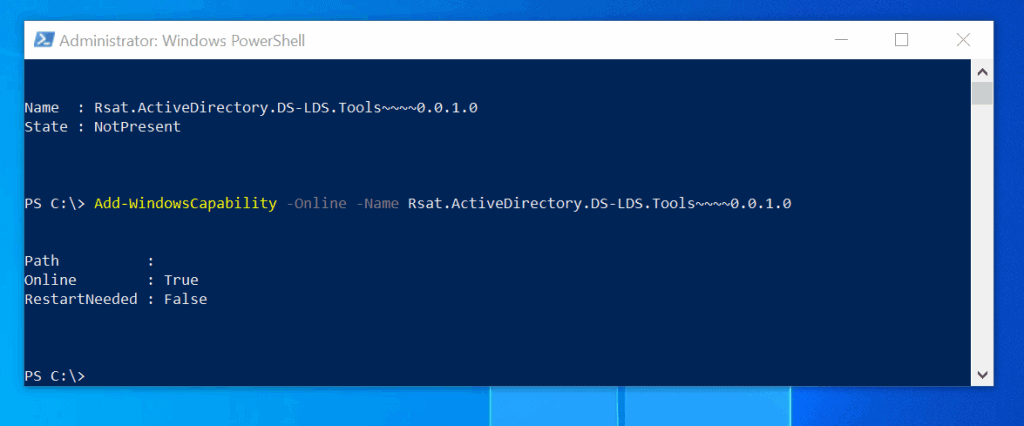
To install the feature with PowerShell, type this command then press enter. Copy the name of the feature from the result of the previous command.
Add-WindowsCapability -Online -Name Rsat.ActiveDirectory.DS-LDS.Tools~~~~0.0.1.0
PowerShell will start installing the feature…it may take a while to complete…
When the installation is completed, it will return a result similar to the one below. If you need to restart your computer, RestartNeeded will display True.
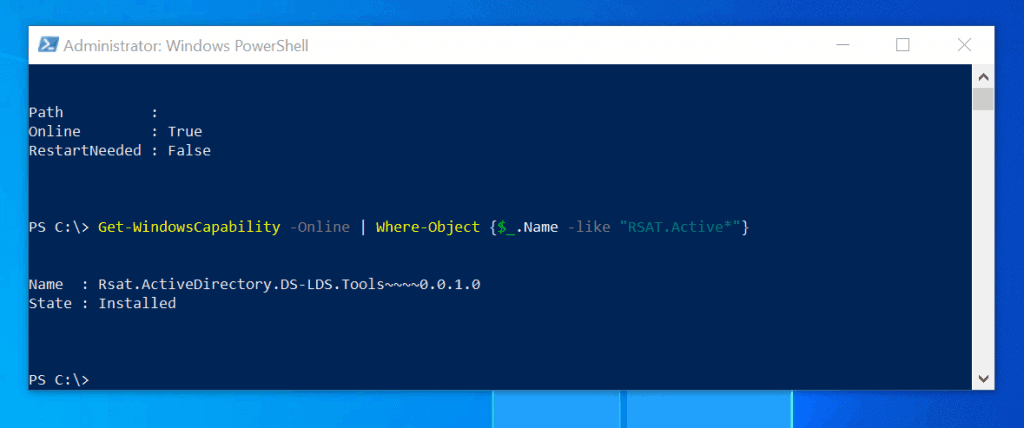
Finally, to confirm successful install, type this command. Then press enter.
Get-WindowsCapability -Online | Where-Object {$_.Name -like "RSAT.Active*"}
The State now shows Installed.
With one of the 3 methods discussed in this guide you should be able to install RSAT for Active Directory in Windows 10.
Have a question, comment or feedback? Use the “Leave a Reply” form. The form is at the end of this page.
For more Windows guides visit our Windows How To page.
- Was this post helpful?
How can I install RSAT on Windows 11?
1. Use Settings
- Press the Start menu button in the Taskbar.
- Now click the the Settings icon.
- From the left side menu select Apps, then click on Optional Features, on the right-side menu.
- Now click on the View features button, which is colored in blue.
- Type RSAT in the search tab and select all the variants you want to install. Click Next to proceed.
- Wait while the selected components are installed.
2. Check the RSAT features installed
- Right-click the Start button and select Windows Terminal (Admin) from the list.
- Type or paste the following command and press Enter to run it:
- You will see the list of all RSAT components installed on your computer. This way you will know exactly what to install. In our case, there isn’t any installed.
3. Use PowerShell
Install the components all at once
- Press Windows Key + X and select Windows Terminal (Admin) option.
- Type or paste the following command and press Enter to run it:
- The process will take a few minutes depending on the capabilities of your system.
Install the components one by one
- Press Windows Key + X and choose Windows Terminal (Admin).
- Run the following command:
NOTE
Be sure to replace tool-name with the name of the component that you want to install. You can see the list of components in Solution 2.
If you need more information, you can check all the RSAT components and their specifications on Microsoft’s dedicated webpage.
How can I run the RSAT tool on my computer?
- Click the Search icon in the Taskbar.
- Enter windows tools and select Windows Tools from the list of results.
- In the next window you will find all the RSAT components you installed. Just double-click any to launch.
How do I uninstall RSAT?
- Press Windows Key + I to open the Settings app.
- Navigate to Apps and select Optional features.
- In the Installed features section, select the RSAT component that you want to uninstall and click on Uninstall.
- Repeat this for all components that you want to remove.
Installing RSAT is simple, and you can do so just like you’re used to any additional feature – from the Settings app. This is the most convenient method, and we recommend it to all first-time users.
The Terminal is also a great method to install this feature, just make sure that it’s set to Windows PowerShell before using it.
If you happen to be worried about RSAT crashes, the tips that you can find in our Windows 10 guide may be used in Windows 11 as well. Most common crashes are caused by incompatibilities between different software versions so don’t hesitate to take action.
Let us know in the comments section below if you managed to install RSAT on Windows 11 or if you have any additional questions. We’d love to hear your opinion.
Was this page helpful?
6
MyWOT
Trustpilot
Thank you!
Not enough details
Hard to understand
Other
x
Contact an Expert
There are 2 comments
Профессиональные советы
Иногда приходится работать на различных клиентах, и нужно иметь возможность управлять удаленным сервером с них. Но повторная настройка может занять много времени. Если версии диспетчера серверов на различных клиентах аналогичны, можно скопировать файлы из указанных ниже мест на исходном клиенте в те же места на новом клиенте. Таким образом, при последующем запуске диспетчера серверов на новом клиенте вы найдете конфигурацию, заданную на предыдущем клиенте.
Скопируйте файлы из следующих расположений:
%appdata%MicrosoftWindowsServerManagerServerList.xml %appdata%LocalMicrosoft_CorporationServerManager.exe_StrongName_GUID6.2.0.0user.config
Помните, что версии диспетчера серверов на исходном и новом клиентах должны быть идентичны.
Collection and Use of Information
To conduct business and deliver products and services, Pearson collects and uses personal information in several ways in connection with this site, including:
Surveys
Pearson may offer opportunities to provide feedback or participate in surveys, including surveys evaluating Pearson products, services or sites. Participation is voluntary. Pearson collects information requested in the survey questions and uses the information to evaluate, support, maintain and improve products, services or sites, develop new products and services, conduct educational research and for other purposes specified in the survey.
Contests and Drawings
Occasionally, we may sponsor a contest or drawing. Participation is optional. Pearson collects name, contact information and other information specified on the entry form for the contest or drawing to conduct the contest or drawing. Pearson may collect additional personal information from the winners of a contest or drawing in order to award the prize and for tax reporting purposes, as required by law.
What are Windows 10 admin tools?
Windows 10 admin tools or ‘Administrative Tools’ is the collective name for several advanced tools and are probably one of the most handy features for any IT admin out there. It allows the admin to manage several parameters of the operating system for quick troubleshooting.
Some of the most commonly used Windows 10 admin tools are as follows:
- Defragment and Optimize Drives — Disk fragmentation occurs when a file is broken up into pieces to fit on the disk. As files are constantly being written, deleted and resized, fragmentation is a natural occurrence. While Windows automatically defragments drives on a regular basis, this tool allows an admin to initiate the process manually.
- Disk Cleanup — Pretty self-explanatory, it allows the admin to remove temporary old files, old logs, empty Recycle Bin, and delete redundant Windows Update files. A filled up hard drive is one of the major causes for a system slowdown and disk clean-up should be a regular activity.
- Print Management — Printer issues are one of the most common problems an IT admin faces. This tool allows the admin to manage printers associated with the system.
- Windows Memory Diagnostic — This tool allows an admin to check for errors in the installed RAM of the system.
- Services — Through this Windows 10 admin tool, one can manage all the system services which run the background.
- System Configuration — It allows an admin to manage the boot up process of a system. Several applications are launched when a system boots up and too many applications launched together can prolong the boot-up process to a crawl. This tool, also known as msconfig.exe, can stop applications from launching when a computer starts/restarts.
- Event Viewer — This tool helps an admin view application and system logs in Windows 10.
- Windows Firewall with Advanced Security — An admin can manage the built-in Windows firewall using this feature.