Как запускать программы linux на основе gui в windows 10
Содержание:
- Ubuntu on WSL
- Базовый набор софта. Есть все, но…
- Рабочие столы Linux
- WSL2 и графические приложения Linux
- Dual Boot Ubuntu and Windows 10: Download Ubuntu
- Installation
- How do I download Wubi?
- How do I install Ubuntu?
- How do I install Wubi on a machine with no Internet connection?
- How can I use a manually downloaded ISO?
- Why is the AMD64 version of Ubuntu being downloaded and installed?
- Can I force Wubi to download and install a 32 bit version of Ubuntu?
- Can I force Wubi to install even if I have less than 5GB of free disk space?
- Which Operating Systems are supported?
- What happens if the installation is interrupted?
- Кому стоит перейти на Ubuntu?
- Ламповый Linux-like терминал в Windows
- Introduction
- How to Install Ubuntu on Windows 10 by Dual Booting Ubuntu
- Brief Introduction to Windows and Ubuntu
- А играть в Ubuntu можно?
- Wubi Customization
- Унификация Win32 и UWP
- Prep your desktop
- Uninstallation
- Запись образа на флешку
Ubuntu on WSL
Installing Ubuntu on WSL via the Microsoft Store (Recommended)
The recommended way to install Ubuntu on WSL is through the Microsoft Store.
The following Ubuntu releases are available as apps on the Microsoft Store:
-
Ubuntu 16.04 LTS (Xenial) is the first release available for WSL. It supports the x64 architecture only. (offline installer: x64)
-
Ubuntu 18.04 LTS (Bionic) is the second LTS release and the first one supporting ARM64 systems, too. (offline installers: x64, ARM64)
-
Ubuntu 20.04 LTS (Focal) is the current LTS release, supporting both x64 and ARM64 architecture.
-
Ubuntu (without the release version) always follows the recommended release, switching over to the next one when it gets the first point release. Right now it installs Ubuntu 20.04 LTS.
Each app creates a separate root file system in which Ubuntu shells are opened but app updates don’t change the root file system afterwards. Installing a different app in parallel creates a different root file system allowing you to have both Ubuntu LTS releases installed and running in case you need it for keeping compatibility with other external systems. You can also upgrade your Ubuntu 16.04 to 18.04 by running ‘do-release-upgrade’ and have three different systems running in parallel, separating production and sandboxes for experiments.
Installing Ubuntu on WSL via rootfs
Ubuntu WSL distribution rootfs daily builds are available for download:
-
Ubuntu 16.04 LTS (Xenial)
-
Ubuntu 18.04 LTS (Bionic)
-
Ubuntu 19.10 (Eoan)
-
Ubuntu 20.04 LTS (Focal)
They can be installed using the wsl command:
document.write(‘
Installing Ubuntu on WSL by sideloading the .appx
Ubuntu WSL distribution .appx builds are available for download:
-
Ubuntu 20.04 LTS (Focal)
-
Ubuntu 18.04 LTS (Bionic)
-
Ubuntu 16.04 LTS (Xenial)
They can be installed by enabling sideloading in Windows 10 and double-clicking the .appx and clicking Install or with PowerShell:
Add-AppxPackage .\CanonicalGroupLimited.Ubuntu18.04onWindows_1804.2018.817.0_x64__79rhkp1fndgsc.Appx
Базовый набор софта. Есть все, но…
В базовую сборку входит весь необходимый для работы набор программ: офисные редакторы документов и таблиц, браузер Mozilla, масса системных утилит.
Все отсутствующее можно взять из собственного магазина приложений. В нем доступны как бесплатные Open-Source проекты, так и платные дистрибутивы крупных разработчиков.
Хочешь — MatLab, хочешь — Blender. Но о Microsoft Office в настольном варианте забудь (впрочем, облачный работает отлично, как и в Android). Либо LibreOffice, либо что похуже.
Работать в бесплатных аналогах можно достаточно эффективно. Об этом стоило было бы написать отдельный материал с альтернативами платным программам, но…
Продукты с многолетней историей имеют пренеприятнейшее свойство: они используются всеми и тянут за собой массу багов, из-за которых даже совместимые альтернативы работают иначе.
Поэтому Libre Office и аналогичные пакеты ломают форматирование файлов из Microsoft Office, а Photoshop все равно придется запускать в «виртуалке».
Рабочие столы Linux
Budgie
Budgie написан с нуля для дистрибутива Solus OS, и прошел долгий путь. Окно приглашения сейчас имеется во многих рабочих столах, но окно приглашения Budgie элегантное и простое по дизайну. Нажмите на кнопку Recommendations , чтобы просмотреть список рекомендуемых программ. Помните, что этот список зависит от используемой ОС и будет содержать разные инструменты в зависимости от того, работаете вы в Ubuntu или Solus.
Графическая оболочка Budgie
В противоположность традиционной метафоре рабочего стола, Budgie не поддерживает по умолчанию создание значков на рабочем столе. Вы должны вручную активировать эту опцию на боковой панели Raven
Хотя она не предлагает столько виджетов, сколько в устоявшихся PC вроде Gnome, проект постоянно совершенствуется, и разработчики постоянно предлагают разумное и интересное взаимодействие, уделяя большое внимание улучшению Raven
Deepin
Изначально разработанный для Deepin Linux, это надежный рабочий стол. DDE хорошо работает в Deepin Linux и Ubuntu, но нам не удалось установить его в Fedora, несмотря на то, что мы пробовали разные сборки Сорт. Жаль, что этот проект пока что не используется другими дистрибутивами Linux, потому что он прекрасен. Кроме того, в нем множество встроенных приложений, которые дополняют его дизайн и внешний вид.
Графическая оболочка Deepin
В отличие от Raven в Budgie, который иногда кажется несколько загроможденным, Центр Управления просторный и хорошо продуманный. Вы можете использовать его, чтобы настроить мышь и трекпад, горячие клавиши, изменить приложения по умолчанию и т. д.; настраиваемые горячие углы позволят получить доступ к меню приложений и панели управления. Хотя DDE загружается немного медленнее, чем другие проекты в нашем списке, он невероятно отзывчив.
Enlightenment
Проекту Enlightenment уже исполнился 21 год, впервые он появился в 1996 г Его долгожительство — свидетельство популярности у пользователей. Проект идеален для маломощных компьютеров, поскольку ему не требуется большой объем ОЗУ, да и просто предлагает привлекательное взаимодействие с конечным пользователем. Enlightenment ничуть не проигрывает по сравнению с остальными, если вы уделите время, чтобы поближе познакомиться с его хитроумным дизайном.
Графическая оболочка Enlightenment
При первой загрузке вам зададут целую серию вопросов, чтобы вы могли настроить среду на свой вкус. Это, например, касается языка по умолчанию и размера верхней панели инструментов окон. Вы также можете настроить панель оболочки внизу рабочего стола — но опять же, все это потребует от вас терпения и желания пробовать разные опции и узнавать, что делает каждая из них.
LXQt
LXQt доступен во многих дистрибутивах Linux, однако его производительность можно в лучшем случае описать, как капризную. Его взбалмошное поведение не позволяет с чистой совестью порекомендовать этот проект, особенно начинающим пользователям, которых его странности сильно огорчат. Минималистский, хотя и вполне функциональный рабочий стол предлагает несколько опций настройки.
Графическая оболочка LXQt
На панели внизу нет никаких приложений, что составляет резкий контраст с панелями других рабочих столов. Вместо этого LXQt предлагает местозаполнитель в левой части панели, куда вы сможете перетащить свои любимые приложения. 8 меню содержится список приложений Categories , Все настраиваемые элементы LXQt вы обнаружите в отдельном списке, расположенном внутри меню Preferences > LXQt settings ,
Pantheon
Pantheon — еще один минималистский, но и стильный рабочий стол. Его интуитивный дизайн способствует приятному взаимодействию с пользователем. Хотя он не может похвастаться готовыми опциями настройки, это легко исправить, установив инструмент Elementary Tweaks. Рабочий стоп предлагает панель вверху с программой запуска приложений в левом углу, В отличие от большинства других рабочих столов, Pantheon не позволяет настраивать верхнюю панель.
Графическая оболочка Pantheon
По умолчанию программа запуска не предлагает списка приложений по категориям, и просто выводит все приложения в списке, не особо отличаясь от Gnome. Желая, чтобы приложения группировались по типам, нажмите на кнопку View applications by categories . Чтобы не прокручивать меню в поисках нужного приложения, просто напечатайте его название, и программа запуска автоматически отфильтрует результаты.
WSL2 и графические приложения Linux
Усовершенствованная версия подсистема Windows для Linux (WSL2) получит возможность прямого запуска приложений Linux с графическим интерфейсом, а также поддержку аппаратного ускорения с помощью GPU. Таким образом, программы, предназначенные для Linux, смогут работать бок о бок с «родным» ПО Windows 10.
Кроме того, вскоре WSL будет поддерживать упрощенный процесс установки с помощью команды “wsl.exe — -install”, что позволит быстрее начать работу с Linux-приложениями в Windows.
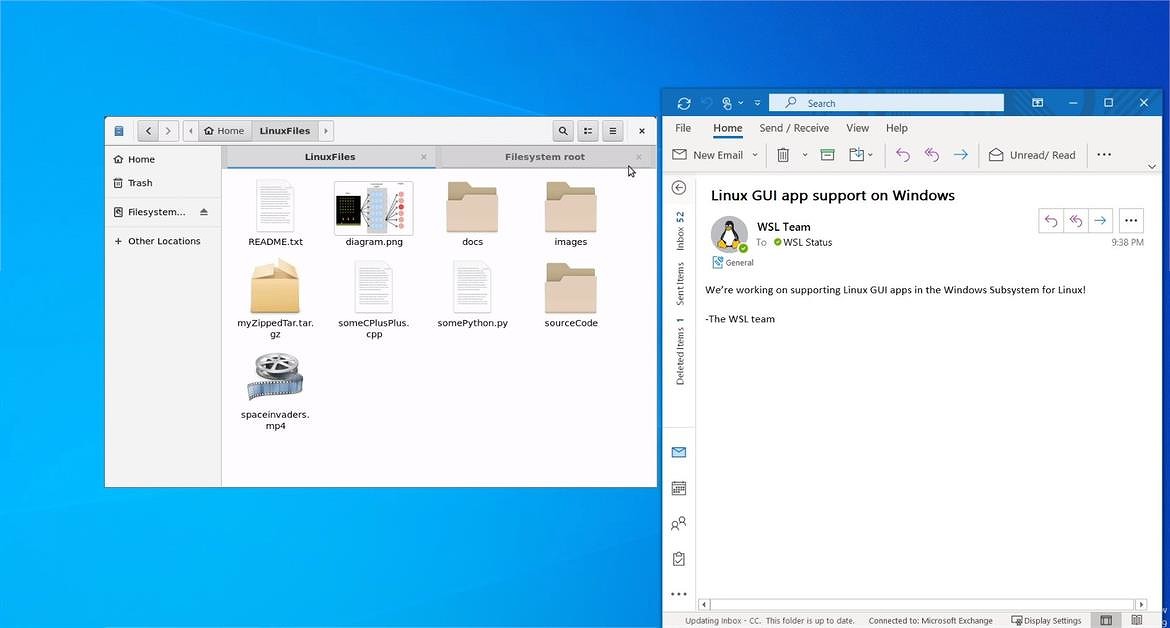
Приложения Windows и Linux смогут работать бок о бок
О разработке второй версии WSL Microsoft впервые сообщила в мае 2019 г
Новое поколение эмулятора для запуска бинарных файлов станет важной частью предстоящего релиза Windows 10 2004, который должен состояться в конце мая 2020 г. Однако некоторые из улучшений, в том числе и поддержка приложений Linux с графическим интерфейсом, не будут доступ доступны на старте, их развертывание будет происходить поэтапно
Первое поколение Windows Subsystem for Linux было анонсировано в апреле 2016 г. и вошло в состав финальной сборки Windows 10 в августе 2016 г. Это своего рода эмулятор для запуска бинарных файлов Linux непосредственно в среде Windows (WSL есть в Windows 10 и Windows Server 2019), релиз которого способствовал появлению в дальнейшем дистрибутивов Ubuntu, Fedora и Suse в фирменном магазине приложений Microsoft Store. После установки, к примеру, Ubuntu пользователь получает возможность запускать скрипты Bash, пользоваться инструментами командной строки Linux, такими как awk и grep, а также использовать Python, Ruby и Git непосредственно внутри Windows. В марте 2018 г. список доступных дистрибутивов пополнил Kali Linux.
Dual Boot Ubuntu and Windows 10: Download Ubuntu
Follow the steps below to download Ubuntu Linux
Open releases.ubuntu.com.

Next, click on the version you wish to install. For this guide, I am downloading version 19.04.
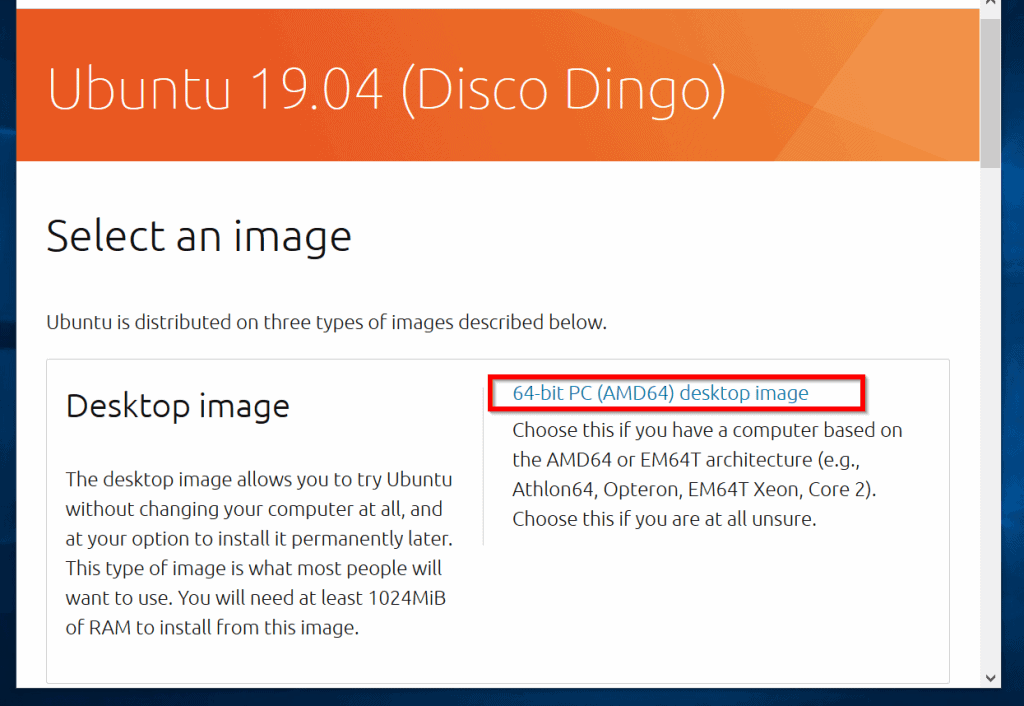
When the above page loads, click the link to download the desktop image. Save the file on a USB stick.
While the download is going on, proceed to the next step. Depending on your internet speed, download may take up to an hour. When the download completes, save the ISO file to your computer.
Then follow these steps below to prepare Ubuntu to boot from a USB stick (or drive).
- Download Universal USB Installer
- Scroll down the page and click Download UUI.

Save the exe file to your computer
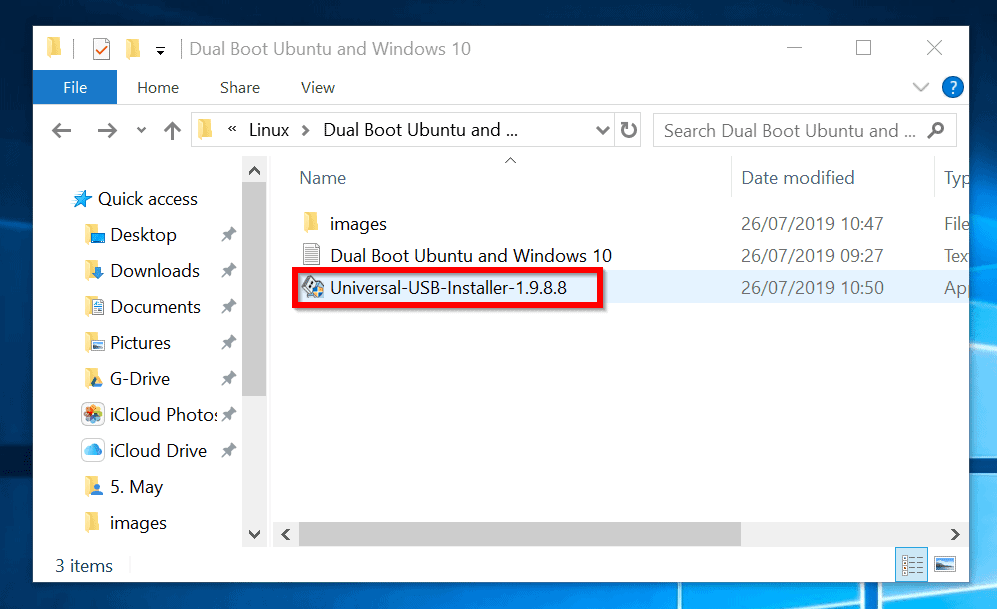
Next, double-click the installer. Then click Yes to the User Acces Control dialogue.
 Before you proceed format your USB with FAT32 file system

On the USB Installer setup click Agree.
When the UUI loads, set it up as shown below. On Step 1, click the drop-down and select Ubuntu. Then on step 2, click browse, navigate to the location you saved the downloaded Ubuntu ISO image and click it. Finally, click the drop-down beneath Step 3 and select the USB drive you wish to use. To create the installer, click Create.
When you click Create, the window below will pop up. Click Yes. The second image below will pop up. Wait for the USB stick preparation to complete.
When the USB prep completes, click Close. Then proceed to the next step.
Installation
How do I download Wubi?
Download Wubi from the Ubuntu Windows Installer cdimages page; this will download the latest version. You can download other versions from the Ubuntu pages on releases.ubuntu.com, e.g. 12.10, look for wubi.exe at the bottom of the page. Wubi is also included on Ubuntu Desktop and Kubuntu CDs.
How do I install Ubuntu?
Run Wubi, insert a password for the new account, adjust other settings such as the disk space, and click «install».
The installation process from this point on is fully automatic.
The installation files (approximately 700MB) will be downloaded and checked, after which you will be asked to reboot.
Do so and select Ubuntu at the boot screen. The installation will continue for another 10 to 15 minutes and the machine will reboot again.
That’s it. Now you can select Ubuntu at the boot screen and start using it.
The standard installation has default settings that should work on most hardware.
You can choose to run Windows or Ubuntu at the system boot screen.
How do I install Wubi on a machine with no Internet connection?
Wubi also works with physical Ubuntu Desktop Live CDs. Wubi.exe is available in the root folder of the CD.
If you do not have a CD, try to find a computer with Internet access, and download both Wubi.exe and the required Desktop ISO from the same location (the release has to match):
-
For 12.10 use http://releases.ubuntu.com/quantal/
-
For 12.04 use http://releases.ubuntu.com/precise/
-
For 11.10 use http://releases.ubuntu.com/oneiric/
-
For 10.04 use http://releases.ubuntu.com/lucid/
Copy both files into the same folder on the machine with no Internet access and run the Wubi executable.
How can I use a manually downloaded ISO?
You need to download the DESKTOP CD ISO of the appropriate version. Place the ISO in the same folder where you have wubi.exe and then run Wubi. For example, Wubi 11.10 requires the 11.10 DESKTOP ISO, available here.
Note that you need a DESKTOP CD ISO. A DVD ISO may not work (except for Edubuntu). Alternate ISO files are not supported.
Why is the AMD64 version of Ubuntu being downloaded and installed?
The machine you are trying to install Ubuntu on is 64 bit. The AMD64 installation is appropriate for all 64 bit architectures, no matter if they are AMD or Intel.
Can I force Wubi to download and install a 32 bit version of Ubuntu?
Yes. Either and place it in the same folder as Wubi.exe or start Wubi from the command prompt with the «—32bit» argument.
To modify arguments without using the command prompt, right-click Wubi.exe and select «Create Shortcut». Then right-click the shortcut, select Properties, and modify the Target line, for example: «C:\Documents and Settings\<user>\Desktop\wubi.exe» —32bit
Can I force Wubi to install even if I have less than 5GB of free disk space?
No. From release 11.10, 5GB is required as a minimum including enough space to store the ISO. On older releases, start Wubi with the argument «—skipspacecheck». Even on older releases, you’ll still require 3GB of space plus room for the ISO. Pushing this limit too hard may cause errors.
Which Operating Systems are supported?
Windows 7, Vista, XP, and 2000 are known to work with Wubi. Windows 98 should also work, but has not been thoroughly tested. Windows ME is not supported. Linux is supported through Lubi.
What happens if the installation is interrupted?
If the installation is interrupted for any reason, you will have to run Wubi.exe again from within the Windows installation (which in turn may force you to uninstall first).
Кому стоит перейти на Ubuntu?
Никакой разницы между базовыми программами нет. Пока не используются специфические функции
Ubuntu даже невооруженным взглядом выглядит самым прожорливым Linux’ом. Но и самым красивым, самым прокаченным.
Поэтому для повседневных задач она подходит превосходно, заменяя любую другую ОС. И не приносит никаких проблем при переезде с macOS или Windows.
Поэтому для офисных работников клавиатуры и мыши, а так же массы девелоперов, имеющих нативные инструменты для Ubuntu и Co это идеальная система. Почти как macOS, только чуть сложнее и с большим количеством возможностей.
Этот CAD заменяет AutoCAD. Почти. Впрочем, KOMPAS и NX для NIX тоже есть
За пределами офисной работы или веб-разработки появляется масса вопросов, связанных с софтом и конкретным используемым оборудованием.
Нативно поддерживается почти все, так что если не нравится Windows, а «хакинтош» по каким-то причинам невозможен — Ubuntu станет лучшим выбором для первой попытки использовать Unix.
Да, что-то может работать с трудом. Но если уж работает — то работает на славу. И заморочек все же меньше, чем с macOS. Попробуйте, если найдется нужный софт: этот опыт стоит того.
iPhones.ru
Есть ли жизнь в NIX?
Ламповый Linux-like терминал в Windows
Вступление (лирическое)
Для меня, автоматизатора-линуксоида, использвание Windows на основной рабочей станции первое время было просто болью и страданием. Но с этим я ничего поделать не мог: корпоративные стандарты и софт, кторый работает только на Windows. В попытке найти золотую середину, я прошёл три стадии. Сначала я только изредка переключался на винду по необходимости. Затем виртуалка на virtualbox-е с X-server-ом. После этого захотелось хоть чуть-чуть того консольного комфорта, который был на линуксе (я использовал Terminator в качестве основного терминала).
После яростного гугления и установки всех эмуляторов терминала под Windows, которые только удалось найти, оказалось, что нет ни одного хоть немного подходящего мне. А хотелось, чтобы вёл себя терминал максимально приближенно к линуксовым вариантам. Например, естественно нужны табы, сплит, выделение текста с прокруткой (когда нужно выделить больше чем один экран), копирование текста в буфер сразу при выделении и т.д.
В итоге я получил «комбайн» как на скриншоте ниже. О том, как это настроить, можно узнать, заглянув под кат.
До того, как получить результат, я даже всерьёз задумался о своём велосипеде (портирование, написание своего). Но лень и здравый смысл взяли свое…
В процессе поиска хорошего терминала, я наткнулся на хабра-топик: Альтернативный терминал для Windows. ConEmu — приложение действительно классное, но оно не для тех, кто долгое время использовал линукс-терминалы. Затем я наткнулся на Mintty (был установлен вместе с Cygwin). Программка отличная, ведёт себя максимально близко к таким терминалам как Gnome-terminal и Terminator, но нет табов.
Оказалось, что вышеупомянутый ConEmu умеет запускать GUI-приложения внутри своих табов! И тут искра надежды начала разгораться… Но хватит лирики, пора приступить к делу!
Настройка
В ConEmu идём в Settings->Tasks и, нажимая плюсик, добавляем нужные таски как на скриншоте:
В нашем случае это:
| Имя таска | Команда |
| cygwin | C:\Cygwin\bin\mintty.exe |
| ssh_local | C:\Cygwin\bin\mintty.exe D:\Work\VMssh.bat |
| cmd | cmd |
| powershell | powershell |
Осторожно! Адский CMD!
Вызывает скрипт старта виртуалки, VMNAME заменить на нужное.
Проверяет запущена ли виртуалка и если нет, то запускает её. Таким образом, мне не нужно помнить запущена ли виртуалка, запускать отдельно VirtualBox и делать дополнительные клики.
Немного «свистелок»
Общая рабочая папка (файлы доступны на винде и на виртуалке) — нужно настроить в VirualBox-e следующим образом:
Также нужно прописать в fstab на виртуалке, чтобы автоматиечски монтировалось при старте.
Заключение
В результате я получил терминал, в котором хоть как-то можно жить. Я ни в коем случае не претендую на исключительность этого решения, но надеюсь кому-то пригодится. Отдельный плюс такого решения — общий текстовый буфер и общие папки. Таким образом, работаем с линукс-виртуалкой так же как и с остальными табами в терминале.
Для тех, кому не нужны GUI-табы и кто использует tmux, есть статья моего коллеги примерно на ту же больную тему: habrahabr.ru/post/196128.
Особая благодарность хабраюзеру Maximus5 за отличный Windows терминал ConEmu!
Introduction
What is Wubi?
Wubi is an officially supported installer for Windows XP, Vista and 7 users that allows Ubuntu to be installed and uninstalled in a safe, easy way as with any other Windows application.
What about Windows 8?
At this time, Wubi does not work with Windows 8 default boot-loader. Thus at this point Wubi would not work on a new Windows 8 machine. You would be able to install, but not reboot into Ubuntu.
If you upgraded to Windows 8 and are using BIOS firmware, Wubi does work, but do not enable hybrid-sleep on Windows 8.
How to use this guide
Please note that this guide is only for issues directly related to the Wubi installer; for general Ubuntu questions please use appropriate resources such as the official Ubuntu documentation, the Ubuntu Forums, or the Ubuntu Guide.
You might also be interested in the Ubuntu Forums Installations & Upgrades section.
How to Install Ubuntu on Windows 10 by Dual Booting Ubuntu
Another method to install Ubuntu on Windows 10 is to dual boot Ubuntu with your existing Windows 10. Ubuntu will be installed as a different operating system.
When your PC starts, you will have the option to either boot to Windows 10 or to Ubuntu.
There are 3 steps to dual boot Ubuntu with Windows 10. The details for each step are covered in the sub-sections below…
1. Create Free Space on the Hard Drive
The first step in this section is to free up some space on your existing Windows 10 hard drive. You will install Ubuntu on this partition. For the steps to perform this task, visit this link – (link opens in a new window).
2. Disable Windows 10 UEFI Secure Boot
Once you have freed up some space to install Ubuntu side-by-side Windows 10, the next step is to disable Windows 10 Secure Boot. This step is necessary to ensure that Ubuntu will boot.
However, there is a risk associated with disabling UEFI secure boot. One risk is that your Windows 10 may be prone to boot sector viruses.
For the steps to disable Windows 10 secure boot, click (link opens in a new window).
3. Install Ubuntu on the Free Partition
The final step to install Ubuntu on Windows 10 by dual-booting both operating systems is to install Ubuntu. For the detailed steps to complete this task, click this link – .
It is easy to install Ubuntu on Windows 10! I hope you found this Itechguide helpful. If you found it helpful, kindly vote Yes to the “Was this post Helpful” question below.
Alternatively, you could ask a question, leave a comment or provide feedback with the “Leave a Reply” form found towards the end of this page.
Finally, for more Windows 10 Itechguides, visit our Windows How-To page.
- Was this post helpful?
Brief Introduction to Windows and Ubuntu
Windows is an operating environment developed by Microsoft and introduced on November 20, 1985. After years of development and perfection, this software is relatively mature and stable, and is still the mainstream operating system of current personal computers.
It has good man-machine interaction, supports much application software, and has strong hardware adaptability. Currently, its flagship product is Windows 10, released on July 15, 2015.
Ubuntu, released by Canonical Ltd., is an open-source operating system based on Debian GNU/Linux. It was first introduced in October 2004 and was rated the best Linux distribution in 2005. Its latest release is Ubuntu 19.04.
Many people want to know the differences between Ubuntu and Windows. This post will show you Ubuntu vs Windows in detail. In addition, if you want to know Linux vs Windows, you also need to read this post. After all, Ubuntu is the best Linux distribution.
А играть в Ubuntu можно?
Нативные игры. Их не счесть
Когда-то давно Linux не стал убийцей Windows именно из-за отсутствия игр. С приходом электронных магазинов дистрибуции все изменилось.
Можно скачать 8 DVD с нативными играми, существующими только для NIX-подобных систем. Среди них платформеры, квесты, небольшие инди-шутеры.
Есть даже специальные сборки Ubuntu с интегрированными играми. Смотрится отчаянно, но многие действительно фанатеют от платформеров.
Популярных и знакомых немного
Нужны ли такие, если есть Steam? Тут можно найти почти все крупные проекты прошлых времен и массу свежих игр.
Исключение составляют ААА-проекты высшего эшелона: условный Cyberpunk 2077 или Senua искать в NIX-версиях бесполезно. Но они работают через Wine, если хватает ресурсов.
Wubi Customization
Can you add Ubuntu-flavor-XYZ to Wubi?
If you want your distribution included into the official release of Wubi, it first requires approval. A live CD ISO must be available to do that (Wubi uses an ubiquity based installer).
How do I compile Wubi from source?
Wubi can be easily rebranded and modified. Get the Wubi source code and modify the files in the ./data directory as you see fit. In particular you may want to change isolist.ini and setting.nsh, you might also want to change english.nsh (to alter the localised strings) and the artwork (image names have to match the headers in isolist.ini).
To compile on a Debian based system, run:
sudo apt-get install gettext build-essential grub-pc mingw32 #Is needed to compile Wubi
make
Note that you need the following:
- A Live CD with ubiquity + casper + lupin-support (which provides lupin-casper)
- The ISO must have a .disk/info formatted like the one in the Ubuntu ISO and with data matching what you provided in the isolist.ini
- If you want users to be able to download the ISO, in your web server you need to provide a metalink file for each ISO provided, the md5 of said metalink files, and the signature of the md5s. To verify the signature you need to add the signing key to data/trustedkeys.gpg. If this is too much trouble, you can disable signature checks in data/settings.nsh. The metalink file must be on a «stable» URL since that is hardcoded in isolist.ini. The metalink file can in turn point to all your mirrors. You will notice that 2 metalink files are provided in isolist.ini, one is for final release, and one for development versions.
Can I use Wubi for non-Ubuntu based distributions?
It should be fairly straightforward to modify the frontend (feel free to ask if you need any help), as shown above. Your Linux distribution must have a mechanism to do unattended installation using a preseed file. Wubi takes advantages of debian-installer/ubiquity presiding. If you use a different mechanism, you will have to modify src/wubi/installer_preseed.nsh. The make prerequisite scripts may need to be updated as well, since they are Debian specific.
Note that upstream files (Linux-side) need to be changed since normal distributions are generally not capable of targeting and booting (and rebooting) off of a loop device. This task was originally accomplished by the Lupin project, but since 7.10 a lot of functionality has been moved upstream. Hence you might want to have a look at:
- Other affected files: update-grub, grub-installer, /etc/init.d/umountfs, /etc/init.d/umountroot, /etc/init/d/sendsigs
Унификация Win32 и UWP
В рамках проекта «Воссоединение» (Project Reunion), анонсированного Microsoft, компания планирует обеспечить простую интеграцию между программными интерфейсами Win32 и Universal Windows Platform (UWP). предоставляя единую платформу для разработки с поддержкой обратной совместимости.
Другими словами, теперь разработчики смогут создавать такие приложения, которые заработают на любом устройстве с Windows 10, вне зависимости от аппаратной платформы и версии операционной системы. Существующие приложения также будет возможно адаптировать к новой модели.
Первыми компонентами новой платформы стали нативный фреймворк для проектирования интерфейса WinUI 3 и WebView2, позволяющий интегрировать веб-содержимое в любое приложение.
Исходный код обеих библиотек открыт и доступен любому желающему в соответствующих репозиториях Github.
Prep your desktop
We’re going to do a bit of housekeeping to keep things neat, so run the command:
In the text editor, enter the lines of code that follow. When done, press Ctrl-O and hit Return to save it, and Ctrl-x to exit the text editor.
Run:
This will make the file we’ve just created executable. Then:
This will “link” that file with another standard X configuration file. Start your newly installed Linux desktop with the following command:
On the first run, a dialog pops up—select to use the default. The Xfce4 desktop appears over the Windows 10 one, so you might want to ensure the Ubuntu window isn’t full-screen, because the window bar can be blocked. You should spot an “Application” menu top-left, there’s a dock at the bottom, with a taskbar running along the top. To quit, use the “Log out” option in the top-left menu (see image below).
You won’t find too much to play with at this point, because it’s a Linux desktop running on a largely sparse distro. You can add programs, such as Firefox, via sudo apt-get install firefox and this then appears under the “Internet” menu. Have fun!
Uninstallation
How do I uninstall Wubi?
Run the uninstaller in «Control Panel > Add or Remove Programs» for Windows XP or lower or «Control Panel > Programs and Features» for Windows Vista or Windows 7. Alternatively, you can run: C:\ubuntu\Uninstall-Ubuntu.exe.
If the uninstaller fails, try downloading and running Uninstall-Ubuntu.exe.
How do I manually uninstall Wubi?
Remove C:\ubuntu and C:\wubildr*
In Windows XP you need to edit C:\boot.ini and delete the Ubuntu/Wubi line. Alternatively you can modify the boot menu via Control Panel > System > Advanced > Startup and Recovery and pressing «Edit». For Windows 98 you have to edit C:\config.sys and remove the Wubi block. For Windows Vista/7, you can use the built-in bcdedit command or install EasyBCD to edit the boot menu. To use bcdedit, run cmd.exe as an administrator, then enter bcdedit to show all boot entries, note the {GUID} specified for the Ubuntu entry, and then remove it: bcdedit /delete {GUID}
To remove Wubi from the add/remove list, delete the registry key: HKLM\Software\Microsoft\Windows\CurrentVersion\Uninstall\Wubi
An easy method of removing this registry key is to paste the following text into a plain editor such as Notepad, close and save the file as something like removeWubiKey.reg (you may wish to go to Folder Options > View and disable the «Hide file extensions for known file types» option to check that the .reg extension has been applied correctly). Then you can perform the rest automatically by opening the file in the normal Windows manner, or choosing the «Merge» option from the right click context menu. Note: The formatting is rather strict, so copy the text exactly for best results. You may need to be logged in as the administrator to delete the key, depending on the version of Windows you are using. User Account Control in Vista may also ask for permission, in the typical fashion.
REGEDIT4
After deleting the registry key, Ubuntu may still appear in the program list. If this is the case, you may be asked if you would like to remove the item from the list.
How do I reinstall Wubi?
Run Wubi.exe again. Wubi will detect that there is an existing installation and you will be offered an option to uninstall. You may want to backup the installation files (the ISO) in order to avoid having to download them again. Note that when you reinstall, the system virtual drive (root.disk) is reset.
How can I make a backup of my Wubi install?
The easiest method is to to simply copy the root.disk to an external medium. In the event that something goes wrong, copy the root.disk back to the Ubuntu folder on the Windows drive. Note that this is not the most efficient method (since it copies the whole root.disk rather than specific data/settings) but it is effective.
Запись образа на флешку
Для записи дистрибутивов Linux на флешку с формированием на ней загрузочной области существует масса инструментов. Большинство пользователей рекомендуют загружать WinSetupFromUSB или малоизвестную, но отлично справляющуюся со своими задачами утилиту Universal UBS Installer.
Скачиваем и запускаем приложение на Windows 10.
- Выбираем название дистрибутива с выпадающего меню как на скриншоте.
- Рядом жмем «Browse» и задаем путь к загруженному iso-файлу.
- Выбираем флешку, ориентируясь по ее буквенной метке, если к ПК подключено несколько USB-накопителей.
- Ставим флажок возле «Format X drive» для форматирования устройства рядом с меню выбора флешки.
- Жмем «Create».